
PX Nudges in Journeys
Have you ever been lured by a captivating notification and clicked on it, only to be overwhelmed by a multitude of purchasing options? This is a common scenario where users face the paradox of choice, facing the difficulty of making decisions when there are so many overwhelming options available. However, there is a solution to this problem: NUDGES IN JOURNEY.
We are happy to announce that now you can orchestrate a truly omnichannel journey in the Netcore customer engagement panel with all push channels and onsite channels in the form of nudges on a single canvas. This greatly simplifies the user experience of creating and managing CE journeys and PX nudges journeys.
Let’s understand how to implement nudges in journeys.
Prerequisites
- Feature Enablement: Netcore Product Experience (PX) feature should be enabled for your Netcore account. Ensure that you have done relevant server-side SDK integration for PX for respective assets.
- Access: User wanting to create CE journey along with PX node, should be present as a user on both CE panel and PX panel. Currently a user who is enabled as SSO login for PX panel cannot create journey from CE panel.
- Please note that this feature is not available in Test Mode (sandbox).
Steps to create Nudge within Journeys
- When you create a journey on the CE panel, you will find a new node “Nudge journey” under action nodes.
- If you are not present as a user on the PX panel, you will be asked to get in touch with the admin of your Netcore panel and reach out to the Netcore helpdesk to get that access. You need to be a registered user on both CE and PX panels in order to use this feature.
- This Nudge journey node can be used with all trigger nodes - data set (Segment or list), trigger activity, business trigger, and geofence.
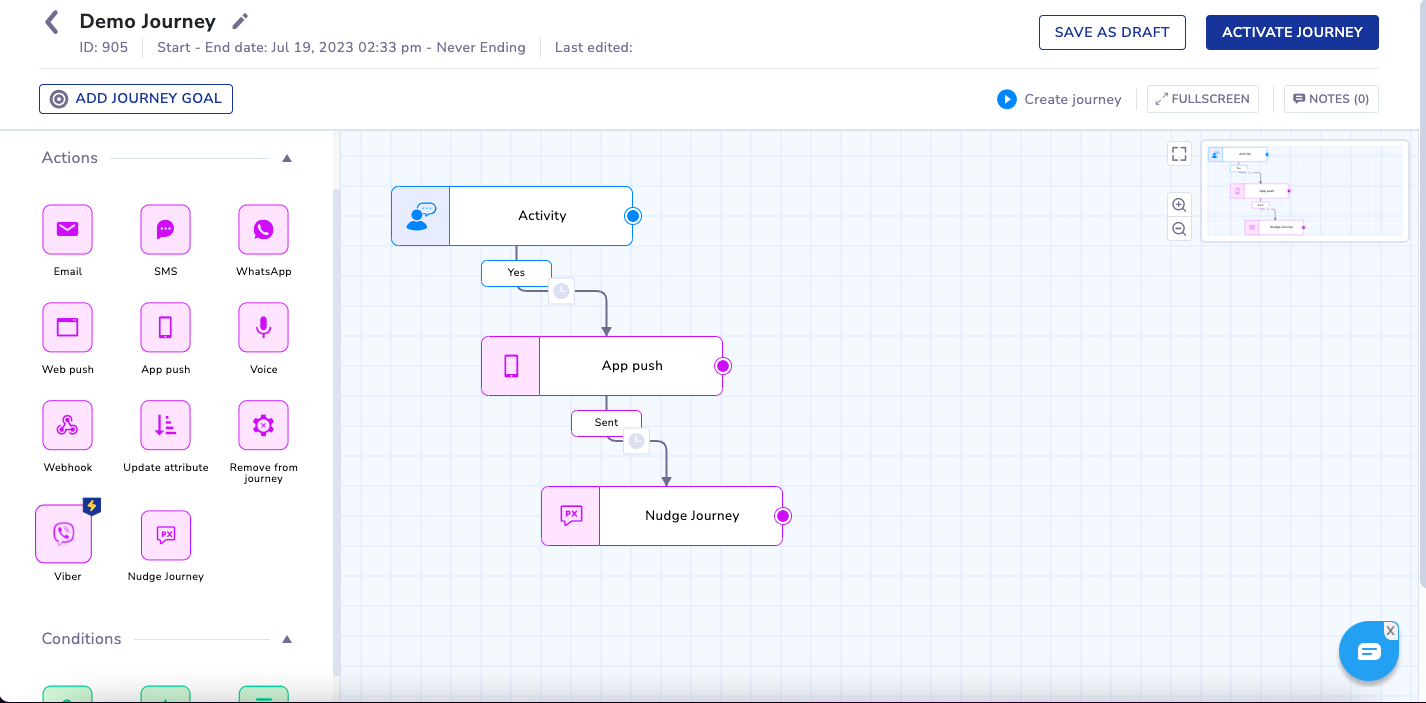
- Once the “Nudge journey” node is added to the CE journey, the flow is as given below:
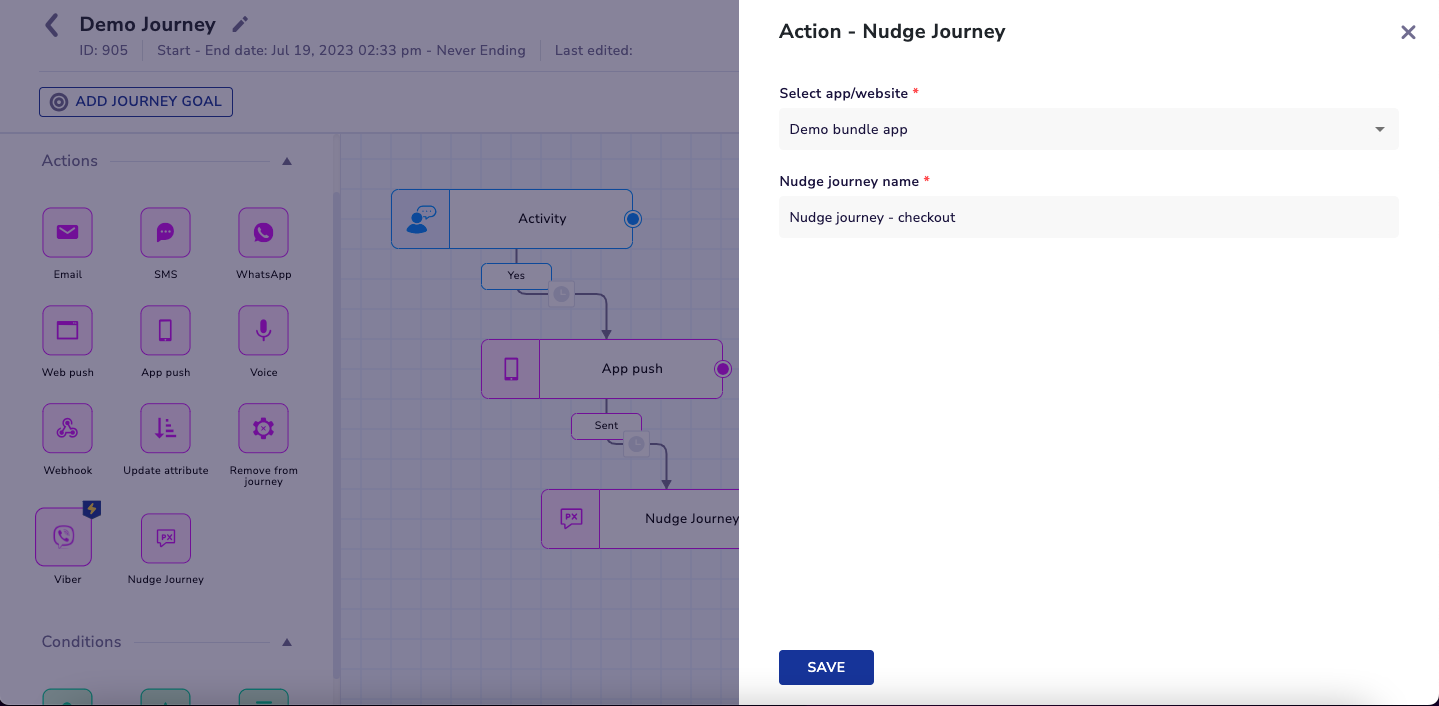
You need to select a specific app or website asset where you want to create the nudge journey.- Then you will be asked to input a nudge journey name, which should be a unique name. Once you click on proceed, you will be shown a nudge journey creation flow.
- Such a nudge journey starts with “earlier set conditions” as an input audience to this nudge journey - which refers to all the conditions applicable from the corresponding CE journey.
- You can continue creating nudges as per the regular flow - such as defining rollout strategy, defining nudges, creating walkthrough, add further segment conditions when you extend the nudge journey.
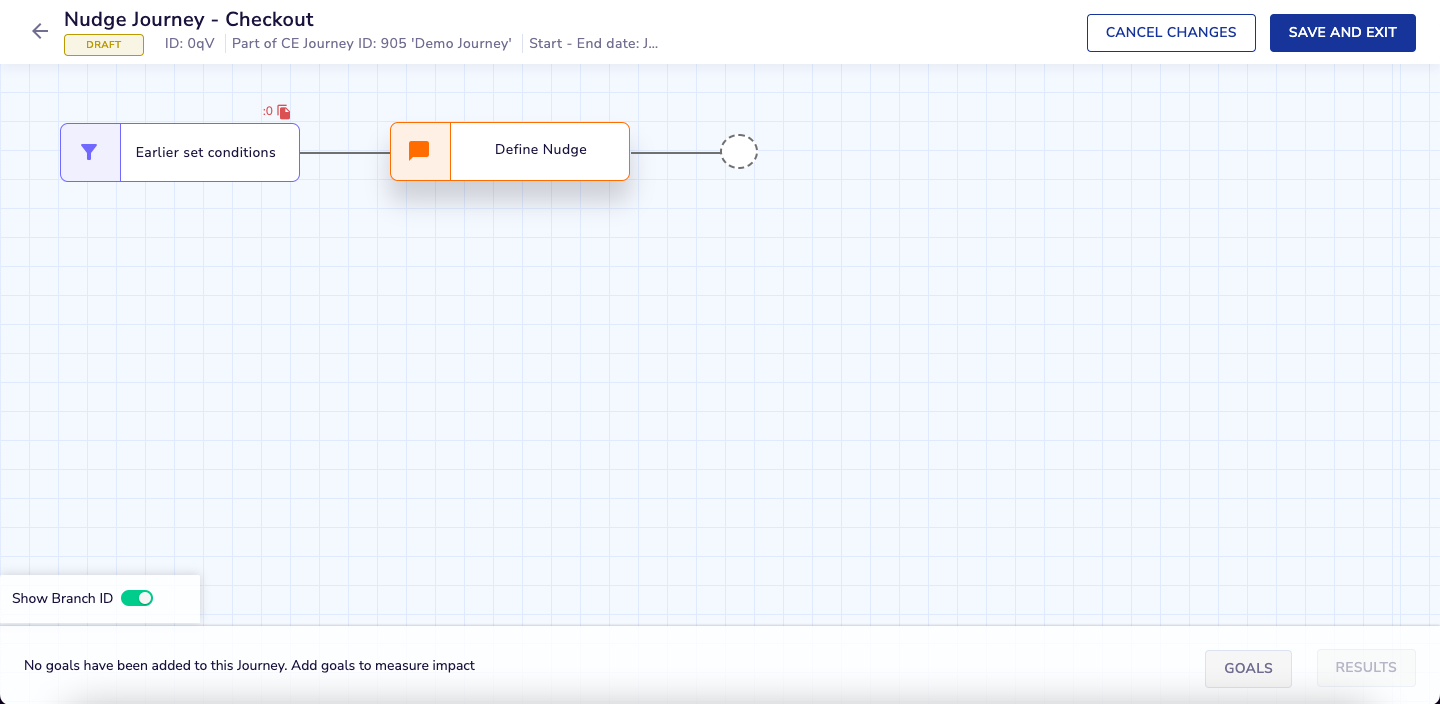
- Once you are done with configuring the nudge journey, you can click on the Save Changes button. In case, you click on the Cancel button, your changes will not be saved and you will be taken back to the CE journey directly.
- Post this, you will have two options -
- Push to test devices - using this option, you can test this Nudge journey on your test devices.
- Save & Exit - Once you are ready, you can click on Save & Exit, and you will be taken back to the CE journey.
- You can continue configuring the CE journey further if needed. Once done, deploy the CE journey.
- Please take note of the below restrictions for such nudge journeys when you use PX panel separately.
- You can’t separately modify the Start date & End date of such a nudge journey, it has to be changed from the corresponding CE journey.
- The segment attached to such a nudge journey at the beginning cannot be edited/changed.
- Such nudge journey status cannot be changed - e.g. it cannot be activated or deactivated.
- Such nudge journeys cannot be cloned or deleted.
- CE journeys having nudge journey node cannot be duplicated.
- Remove from the journey node will remove the user from PX as well as CE journey as well.
- Resume/Activate action on the CE journey will activate the corresponding nudge journey. Pause/Stop action on CE journey will deactivate the corresponding nudge journey.
- For checking nudge reports, please log in to your PX panel.
- Please note that this feature is not supported in Test Mode (sandbox).
- Please note that this feature does not support feature management PX journeys.
Best Practices
- When you edit the CE journey to make any modifications, always ensure to click on the activate button to redeploy your changes. Also, please note that changes done in the PX nudge journey node will come into effect immediately.
- Be careful while using nudges on a dataset - segment or list. Do not change a segment or a list in a running CE journey. You should always try to create a new journey or else pause the journey and then change the segment/list and redeploy the journey.
- Use appropriate frequency capping configuration and stop conditions that are available on the PX panel, CE journey frequency capping is not applicable for nudges.
- If you need to remove users from a given Nudge journey, you can incorporate appropriate stop conditions or use the “Remove from Journey” node in the CE journey.
Use Cases
To gain a deeper understanding of how these two powerful tools work in conjunction, let's explore sample use cases that illustrate this collaborative functionality. Here in the below use case, the user has received a push notification reminding him/her to complete a purchase, and when the notification is clicked, a nudge highlights that product is running low on stock.
Updated 11 days ago