
Shopify
Shopify plugin integration steps
1) Panel setup
The Shopify integration process is essentially divided into the following parts. We support Email ID, Mobile number and Customer ID as Primary key for all Shopify stores. However, we strongly recommend using Shopify Customer ID as the PK for seamless functioning of all features and prevention of any data loss.
NOTE : Nomenclature for Primary key should be strictly followed as given below.
- Email ID should be 'EMAIL'
- Mobile number should be 'MOBILE'
- Customer ID should be 'CUSTID'
- To connect to the Shopify store, go to "Assets" -> "Websites" and select "Add Website". Refer to the below image.

- On mouse hover of "Add Website", you will be able to see 3 options - Standard, Shopify or Magento.
Click on "Shopify" to proceed further.

- You will need to provide your Website URL and Shopify store name as shown below

-
Next you can click on the "Save" button followed by the "Connect" button.
-
Following attributes need to be created on the panel before installation of the plugin:
-NAME - textline - captured with Customer Register event and Product purchase event
-FIRST_NAME - textline - captured with Customer Register event and Product purchase event
-LAST_NAME - textline - captured with Customer Register event and Product purchase event
-MOBILE - textline - captured with Customer Register event and Product purchase event
-CUSTID - textline - captured with Customer Register event and Product purchase event
-SIGNUPDATE - date (YYYY-MM-DD) - captured with customer register event
-CITY - textline - captured with Product purchase event
-COUNTRY - textline - captured with Product purchase event
-STATE - textline - captured with Product purchase event
-ZIP - textline - captured with Product purchase event
-SOURCE - textline - This additional attribute is to be created when we are tracking data from multiple websites to the panel. This attribute can be filled with the website name for future identification.Note: Only these attributes should be pre-created on the panel before integration.
2) Plugin installation
- The following information will be shared by our integration team to the development team to generate a plugin installation link for your store:
-Website
-Store name
-Panel name
-Primary Key - Using this link, you can install our plugin on your Shopify store.
Note: Only a superuser is authorised to set up the plugin. - After the app is set up in the client store, go back to the CEE panel and click on the "Connect" button on your website asset.
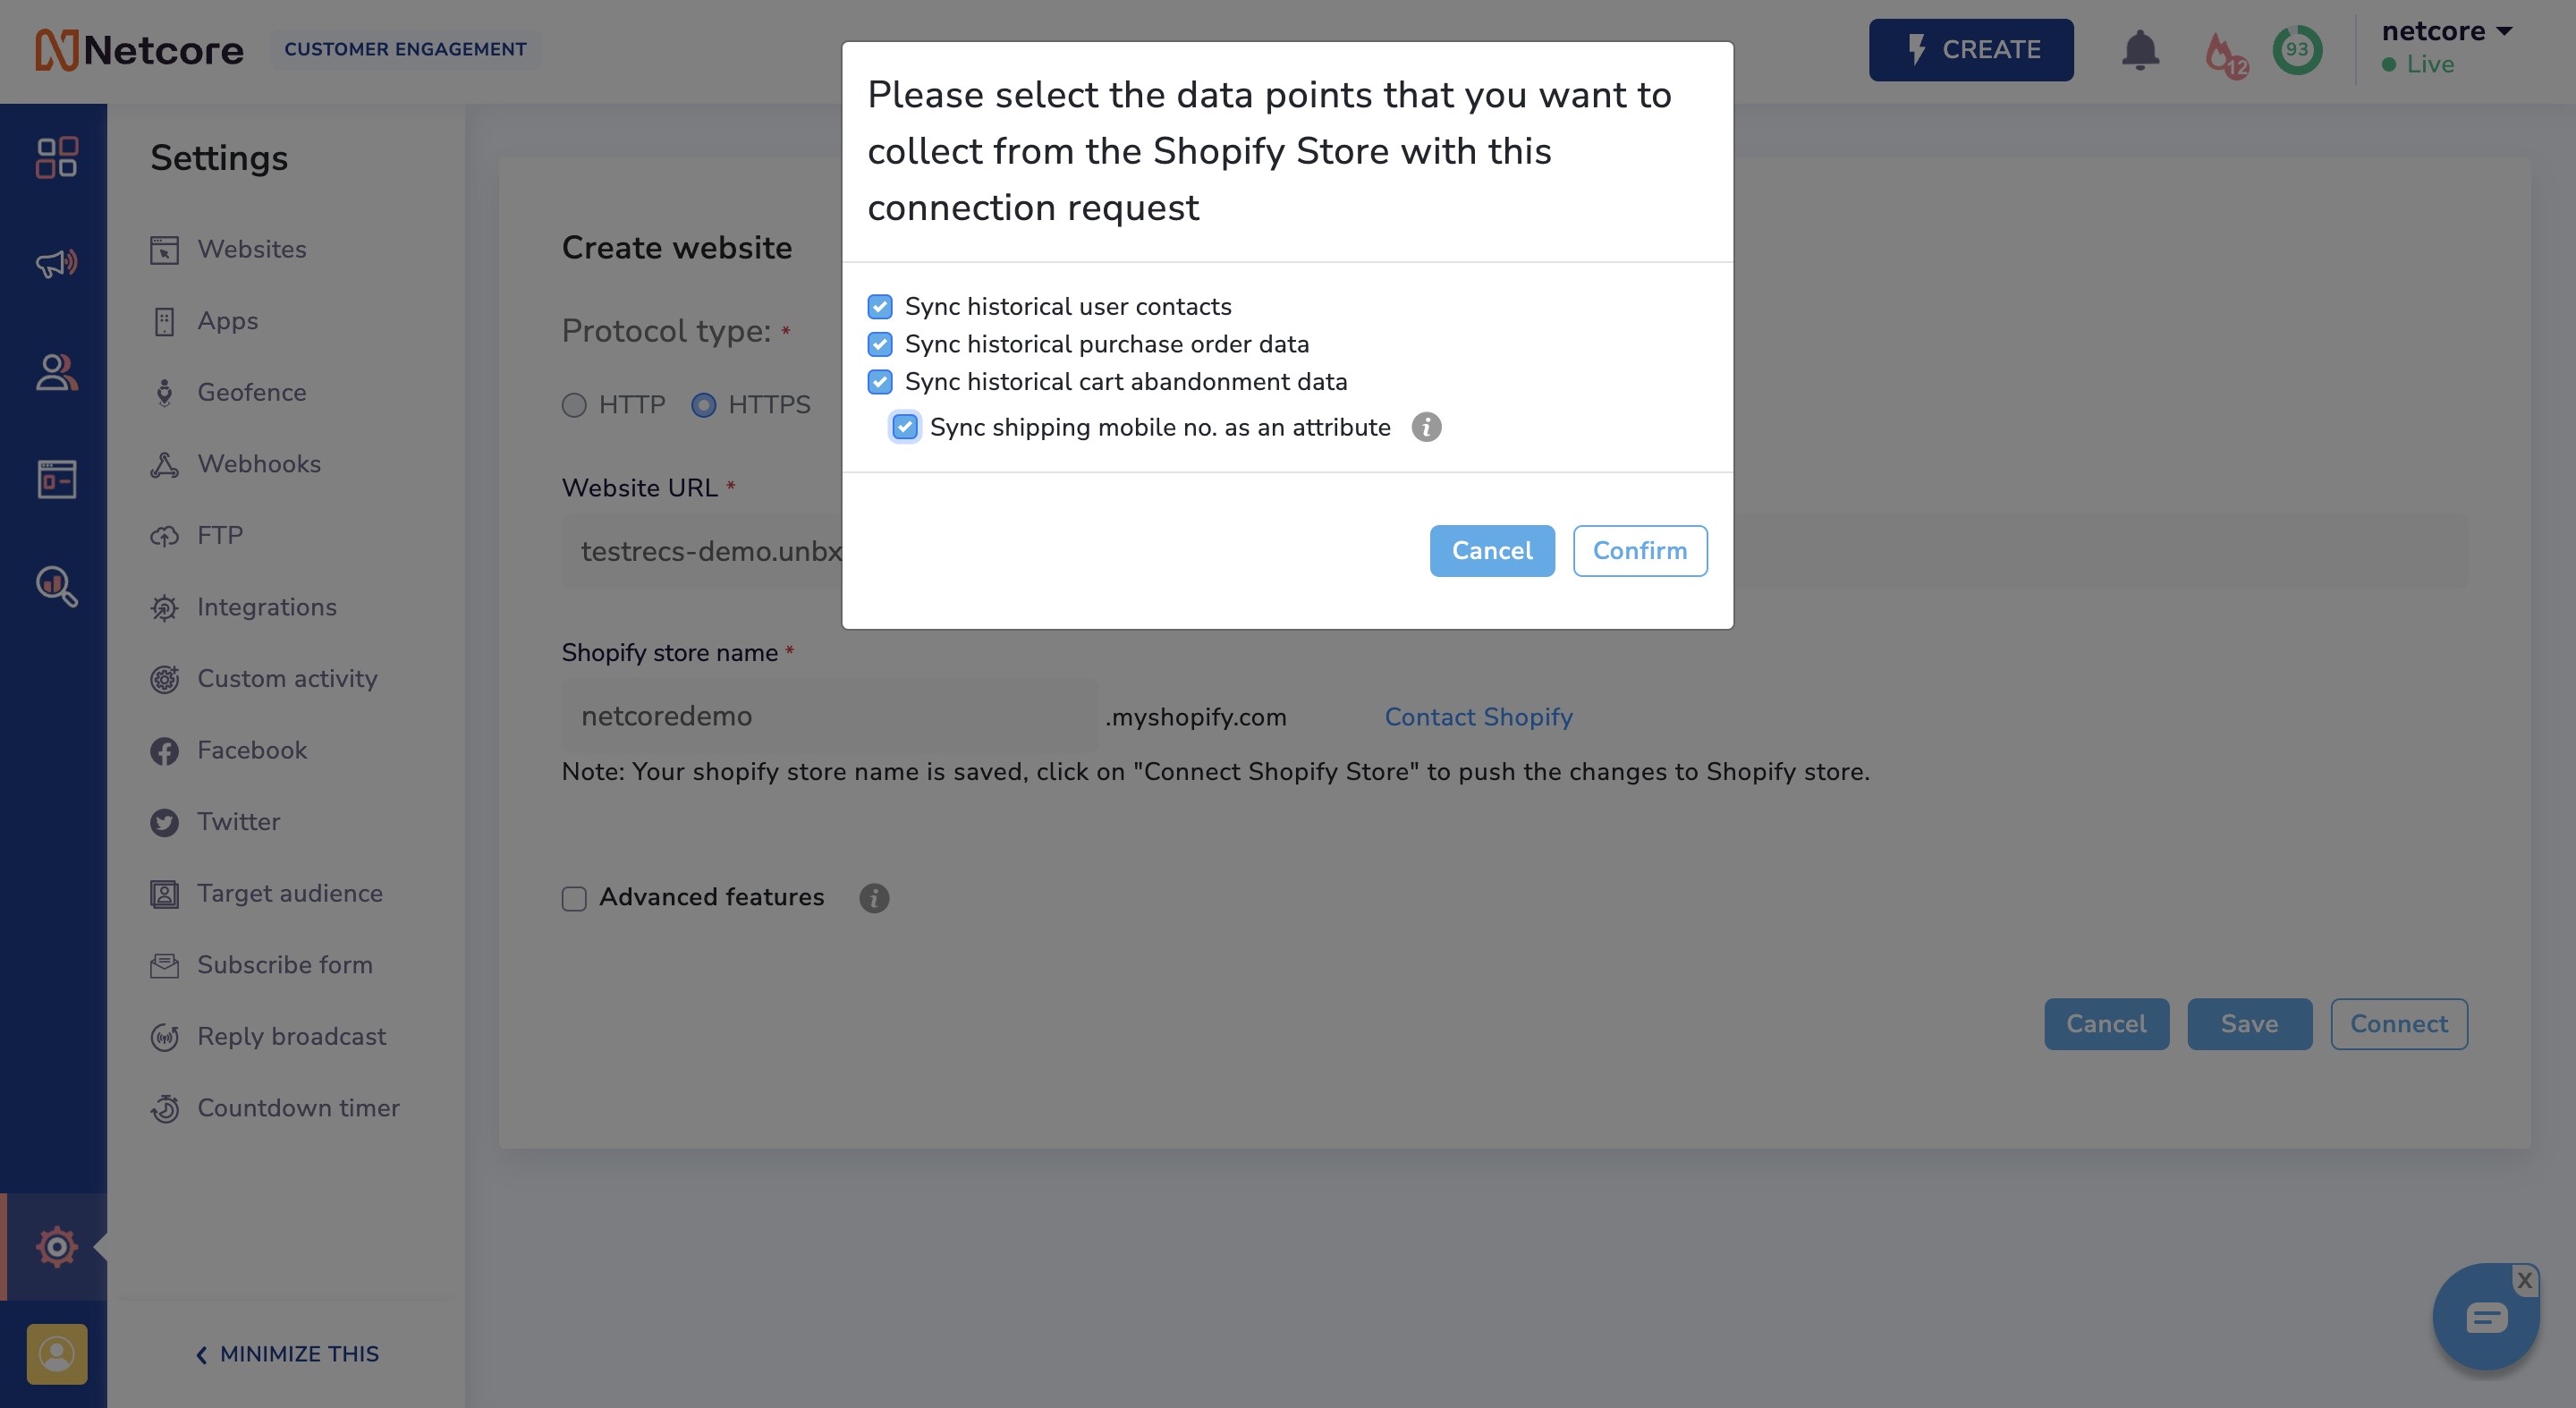
- On clicking on the 'Connect' button, a pop-up will appear to start historic data sync from your Shopify store to Netcore's CEE panel. This should be done only during the first setup.
The following data points would be synced:- The first stage would start the sync process for Product Purchase Order Data - Last 60 days of data
- Second Stage it would sync your Cart Abandonment Data - Last 60 days of data
- The third Stage would sync your user contact information into CEE- All Contacts
- In case you want to temporarily stop the plugin usage, click on "Disconnect" besides the Shopify Store Name.
3) Data points captured through the plugin
-
Historic Product Purchase and Abandon Cart data for last 60 days and all your user contacts from Shopify store.
-
Following JavaScript events will be captured for all user activities done on your Shopify website :
- Page Browse
- Product Search
- Product View
- Checkout
- Add to Cart
- Remove from Cart
NOTE:
- JS event integration would work seamless only if you have used Shopify's standard theme to build your website. If any other custom theme is used, please make sure to check the functioning and capturing of these events thoroughly before proceeding ahead.
- If events are not coming through please refer to the following link for debugging - https://cedocs.netcorecloud.com/docs/checks-for-onboarding
Payloads captured for all events
JS events
| Event Name | Description | Parameters |
|---|---|---|
| Page Browse | Whenever the user is browsing a page, this event is fired. | 1. Page URL 2. PageTitle |
| Product View | Whenever the user views a Product on the Product Display Page | 1. Product Id - prid 2. Product Price 3. Product Name 4. Product Image 5. Product URL 6. Product Type 7. Currency 8. CompareatPrice 9. Brand |
| Product Search | Whenever the user searches a Product | 1. Key Word used 2. Products (Array of Product Id Displayed) |
| Add To Cart | Whenever the user does a Add to Cart from the Product Display Page | 1. Product Id 2. Product Price 3. Product Name 4. Product Image 5. Product URL 6. Product Type 7. Currency 8. Product Quantity 9. Brand 10. Variant 11. Activity Date (TimeStamp) |
| Remove From Cart | Whenever the user Removes a Product from the Cart | 1. Product Id 2. Product Price 3. Product Name 4. Product Image 5. Product URL 6. Product Type 7. Currency 8. Product Quantity 9. Brand 10. Variant 11. Activity Date (TimeStamp) |
| Customer Register | Whenever a user signs up on the Website. This will also insert the user and it's details as one of your contacts. | 1. First Name 2. Last Name 3. Email Address 4. Mobile |
| Checkout | Whenever the user does a Checkout event either by clicking on the Buy Now or from the Cart page | 1. Item count 2. Total price 3. Items: { : - Product Id - Name - Image - Price - Product URL - Product Type - Currency - Variant |
| Product Purchase | When a user successfully purchases a Product From your Website | 1. Item Count 2. Order Number 3. Amount 4. Shipping City 5. Shipping Region 6. Shipping Country 7. Shipping Cost 8. Shipping Address 9. Billing Address 10. Shipping Method 11. Discount 12. Items: "1. P: - Product Id - Name - Image - Price - Product URL - Product Type - Currency - Variant - Compareatprice |
- Following events would be tracked using Shopify webhooks :
- Customer Registration
- Cart Abandonment
- Product Purchase
- Checkout Started
- Order Fulfilled
- Fulfillments update
- Order Cancelled
Fufillments update
Fulfillment Updates Webhooks data from Shopify provides real-time information about changes in the fulfillment status of orders.
In Shopify, the Fulfillment Updates Webhook provides information about changes in the fulfillment status of orders. The webhook may include various statuses, indicating the current state of the fulfillment process.
Statuses :
Common fulfillment statuses in Shopify include:
-
Pending:
- Description: The order is awaiting fulfillment processing.
-
Open:
- Description: The order is open for fulfillment, and items are being prepared.
-
In Progress:
- Description: The fulfillment process is currently in progress.
-
Complete:
- Description: All items in the order have been successfully fulfilled.
-
Shipped:
- Description: The order has been shipped to the customer.
-
Cancelled:
- Description: The fulfillment process has been canceled, and items may not be shipped.
-
Restocked:
- Description: Items from a canceled order have been restocked.
These statuses represent different stages in the fulfillment lifecycle, from the initial placement of an order to its successful completion or cancellation. Businesses can leverage these statuses to track and manage orders effectively, automate customer notifications, and optimize inventory management based on real-time fulfillment updates.
Use-cases :
Here are some use-cases for leveraging this data:
-
Order Tracking Notifications:
- Use-Case: Send automated order tracking notifications to customers.
- Implementation: Trigger email or SMS notifications to customers when the fulfillment status changes to "Shipped," providing them with real-time tracking information.
-
Post-Purchase Surveys:
- Use-Case: Gather customer feedback after the order has been fulfilled.
- Implementation: Automatically send post-purchase survey emails to customers once their orders are marked as fulfilled, collecting valuable insights to improve customer satisfaction.
-
Inventory Management:
- Use-Case: Update inventory levels based on fulfilled orders.
- Implementation: Integrate with inventory management systems to automatically update stock levels in real-time as orders are fulfilled, ensuring accurate product availability.
-
Customer Engagement Campaigns:
- Use-Case: Target customers with relevant campaigns after order fulfillment.
- Implementation: Launch marketing campaigns, such as cross-selling or product recommendations, specifically targeting customers whose orders have been recently fulfilled.
-
Segmentation for Marketing Campaigns:
- Use-Case: Segment customers based on fulfillment status for targeted marketing.
- Implementation: Create customer segments using fulfillment data to tailor marketing campaigns. For example, target customers who recently received their orders with exclusive offers.
-
Performance Analytics:
- Use-Case: Analyze fulfillment speed and efficiency.
- Implementation: Track the time taken from order placement to fulfillment completion. Use this data for performance analytics to identify areas for improvement in your fulfillment processes.
-
Custom Workflows:
- Use-Case: Implement custom workflows based on fulfillment events.
- Implementation: Design unique workflows triggered by fulfillment updates, such as notifying specific teams or initiating internal processes based on specific fulfillment statuses.
-
Customer Support Automation:
- Use-Case: Automate customer support responses related to fulfillment.
- Implementation: Set up automated responses to common customer queries about order fulfillment, providing a seamless and timely support experience.
By utilizing Fulfillment Updates Webhooks data, businesses can enhance operational efficiency, improve customer communication, and create personalized experiences based on real-time order fulfillment information.
Payloads :
| Payloads | Definition | Sample value |
|---|---|---|
| created_at | date of the event | 2024-01-04T09:59:10-05:00 |
| email id of customer | [email protected] | |
| id | event id | 5013399666995 |
| items.produrl | product url | https://prapp17-dev.myshopify.com/products/bangle-bracelet |
| items.name | name of the product | Bangle Bracelet |
| items.brand | brand of the product | Company 123 |
| items.prqt | quantity of the product | 5 |
| items.image | image url of the product | https://cdn.shopify.com/s/files/1/0816/8266/1683/products/bangle-bracelet-with-jewels_925x_8127a463-a76f-43f4-bd4d-da1d1de29364.jpg?v=1697887026 |
| items.currency | currency in which the product was priced | INR |
| items.producttype | type of product | Bracelet |
| items.variant | variant of the product | AB1123 |
| items.price | price of the product | 450.99 |
| items.type | type of the product | Bracelet |
| items.compareatprice | previous price of product | 479.99 |
| items.prid | unique identifier of the product | 1937932784 |
| location id | unique identifier associated with a particular location | 123456789 |
| order_id | unique identifier of the order | 128197392 |
| shipment_status | shipment status | Shipped, In transit, etc. |
| status | status of the event | status mentioned above |
| name | Name or identifier associated with the cancelled order. | # 1407.1 |
| tracking_company | shipping provider | Other |
| tracking_number | unique identifier | 432433123 |
| tracking_numbers | for multiple products | ['432433123'] |
| tracking_url | tracking url | https://www.myntra.com |
| tracking_urls | for multiple products | ['https://www.myntra.com'] |
| updated_at | last updated date | 2024-01-04T09:59:34-05:00 |
Order cancelled
The Order Cancelled webhook in Shopify is an event triggered when a customer or the store administrator cancels an order. This event provides real-time notification about the cancellation of an order, allowing integrated systems to respond accordingly.
Use-Cases :
Send automated emails or notifications to customers confirming the cancellation.
Provide information on the refund process if applicable.
Payloads :
| Payloads | Definition | Sample value |
|---|---|---|
| browser_ip | user's browser's IP address | 14.142.143.138 |
| cancel_reason | reason for order cancellation | customer |
| cancelled_at | date and time of cancellation | 2024-01-04T09:58:47-05:00 |
| confirmation_number | confirmation number | 123445676 |
| confirmed | confirmation status | true |
| contact_email | email id of user | [email protected] |
| created_at | date and time when the event was created | 2024-01-04T09:57:24-05:00 |
| currency | currency of purchase | INR |
| current_subtotal_price | subtotal | 800.00 |
| customer_locale | location of order | en-IN |
| device_id | device of customer | 4 |
| fulfillable_quantity | total quantity of order | 1 |
| fulfillment_service | service provider | fedx |
| fulfillment_status | fulfillment status | Shipped |
| gift_card | if gift card is used in the order | false |
| grams | weight | 0 |
| id | cancellation id | 5687355867443 |
| items.produrl | product url | https://prapp17-dev.myshopify.com/products/chain-bracelet |
| items.name | name of the product | chain-bracelet |
| items.brand | brand of the product | Company 123 |
| items.currency | currency in which the product was priced | INR |
| items.producttype | type of the product | Bracelet |
| items.variant | variant of the product | ABC1123 |
| items.price | price of the product | 499.99 |
| items.type | type of the product | Bracelet |
| items.compareatprice | previous price of product | 479.99 |
| items.prid | unique identifier of the product | 1937932784 |
| name | name of product | Ipod |
| number | number of product | 999303993 |
| order_number | unique identifier of order | 23874 |
| order_status_url | url of the order status window | https://jsmith.myshopify.com/548380009/orders/123456abcd/authenticate?key=abcdefg |
| location_id | unique identifier associated with a particular location | 123456789 |
| payment_gateway_names | payment gateway name | Visa |
| phone | mobile number of customer | 9990099928 |
| price | total price of order | 560.99 |
| referring_site | provides information about the URL of the site from which the customer navigated to your Shopify store before placing the order | www.external-site.com |
| source | source of order | NA |
| source_identifier | unique identifier of order | 9b98dbd8612e77fabb3f25705ab9299c |
| source_name | name of the source of order | web |
| source_url | url for source | www.sample.com |
| title | shipping title | Generic Shipping |
| total_weight | total weight of the order | 256.89 |
Checkout_Started
| Payload | Definition | Sample Value |
|---|---|---|
| abandoned_checkout_url | The recovery URL that's sent to a customer so they can recover their checkout. | https://netcoredemo.com/64358716577/checkouts/3e8dcced60f8024ed4a21d6a286ed5c8/recover?key=6ffc483fb2d92b0f84ee7c5eeb53b4f5 |
| cart_token | The ID for the cart that's attached to the checkout. | Z2NwLXVzLWNlbnRyYWwxOjAxSFJBQ002RkFUU0RENlZKNlBXMDRGOVFM |
| currency | The three-letter code for the shop currency | IND |
| checkoutid | 31616663093404 | |
| customer_currency | IND | |
| customer_first_name | John | |
| customer_id | Unique ID generated by Shopify | 123446 |
| customer_last_name | Plank | |
| customer_last_order_id | 456234682 | |
| customer_last_order_name | A0968945 | |
| customer_locale | ||
| customer_orders_count | 12 | |
| customer_phone | 8970653421 | |
| customer_state | enabled | |
| customer_tags | ||
| customer_total_spent | 12096.90 | |
| customer_verified_email | true | |
| discount_codes_1 | ||
| discount_codes_2 | ||
| items | Collection of products (array) | |
| landing_site | ||
| ship_address1 | ||
| ship_address2 | ||
| ship_city | ||
| ship_country | ||
| ship_phone | ||
| source | ||
| source_name | ||
| subtotal_price | ||
| taxes_included | ||
| total_discounts | ||
| total_weight | ||
| total_price | ||
| total_tax | ||
| total_line_items_price |
Other features
You can enable browser push notification feature by editing Shopify Store details. Fill the necessary details like fcm key, etc and then click on "Re-connect" to pass all the changes to Shopify store to activate browser push feature.

What happens once you connect your Shopify Store with CEE:
- System would first start syncing your historical information from the Shopify platform to CEE in the following order:
1.1 - The first stage would start the sync process for Product Purchase Order Data - Last 60 days of data
1.2 - Second Stage it would sync your Cart Abandonment Data - Last 60 days of data
1.3 - The third Stage would sync your user contact information into CEE- All Contacts
Note
Keep the below mentioned attributes in our panel already created, before integrating with Shopify
- NAME - textline - captured with Customer Register event and Product purchase event
- FIRST_NAME - textline - captured with Customer Register event and Product purchase event
- LAST_NAME - textline - captured with Customer Register event and Product purchase event
- MOBILE - textline - captured with Customer Register event and Product purchase event
- CUSTID - textline - captured with Customer Register event and Product purchase event
- SIGNUPDATE - date (YYYY-MM-DD) - captured with customer register event
- CITY - textline - captured with Product purchase event
- COUNTRY - textline - captured with Product purchase event
- STATE - textline - captured with Product purchase event
- ZIP - textline - captured with Product purchase event
Adding Custom attributes
To know more about adding custom attributes click here
-
Second it would auto-capture out of the box events that a Shopify website provide with detailed event information.
-
It would trigger an offline Cart Abandonment Activity every time user abandons their cart. This is a functionality provided by Shopify which creates a Cart Abandonment list every time a user Adds a Product but does not purchase within a few minutes.
Now whenever your Shopify store would do this, the same would be passed to CEE as well in the form of offline activity.
New release!
Mobile no. and Customer ID can now be used as Primary Key for all Shopify websites!
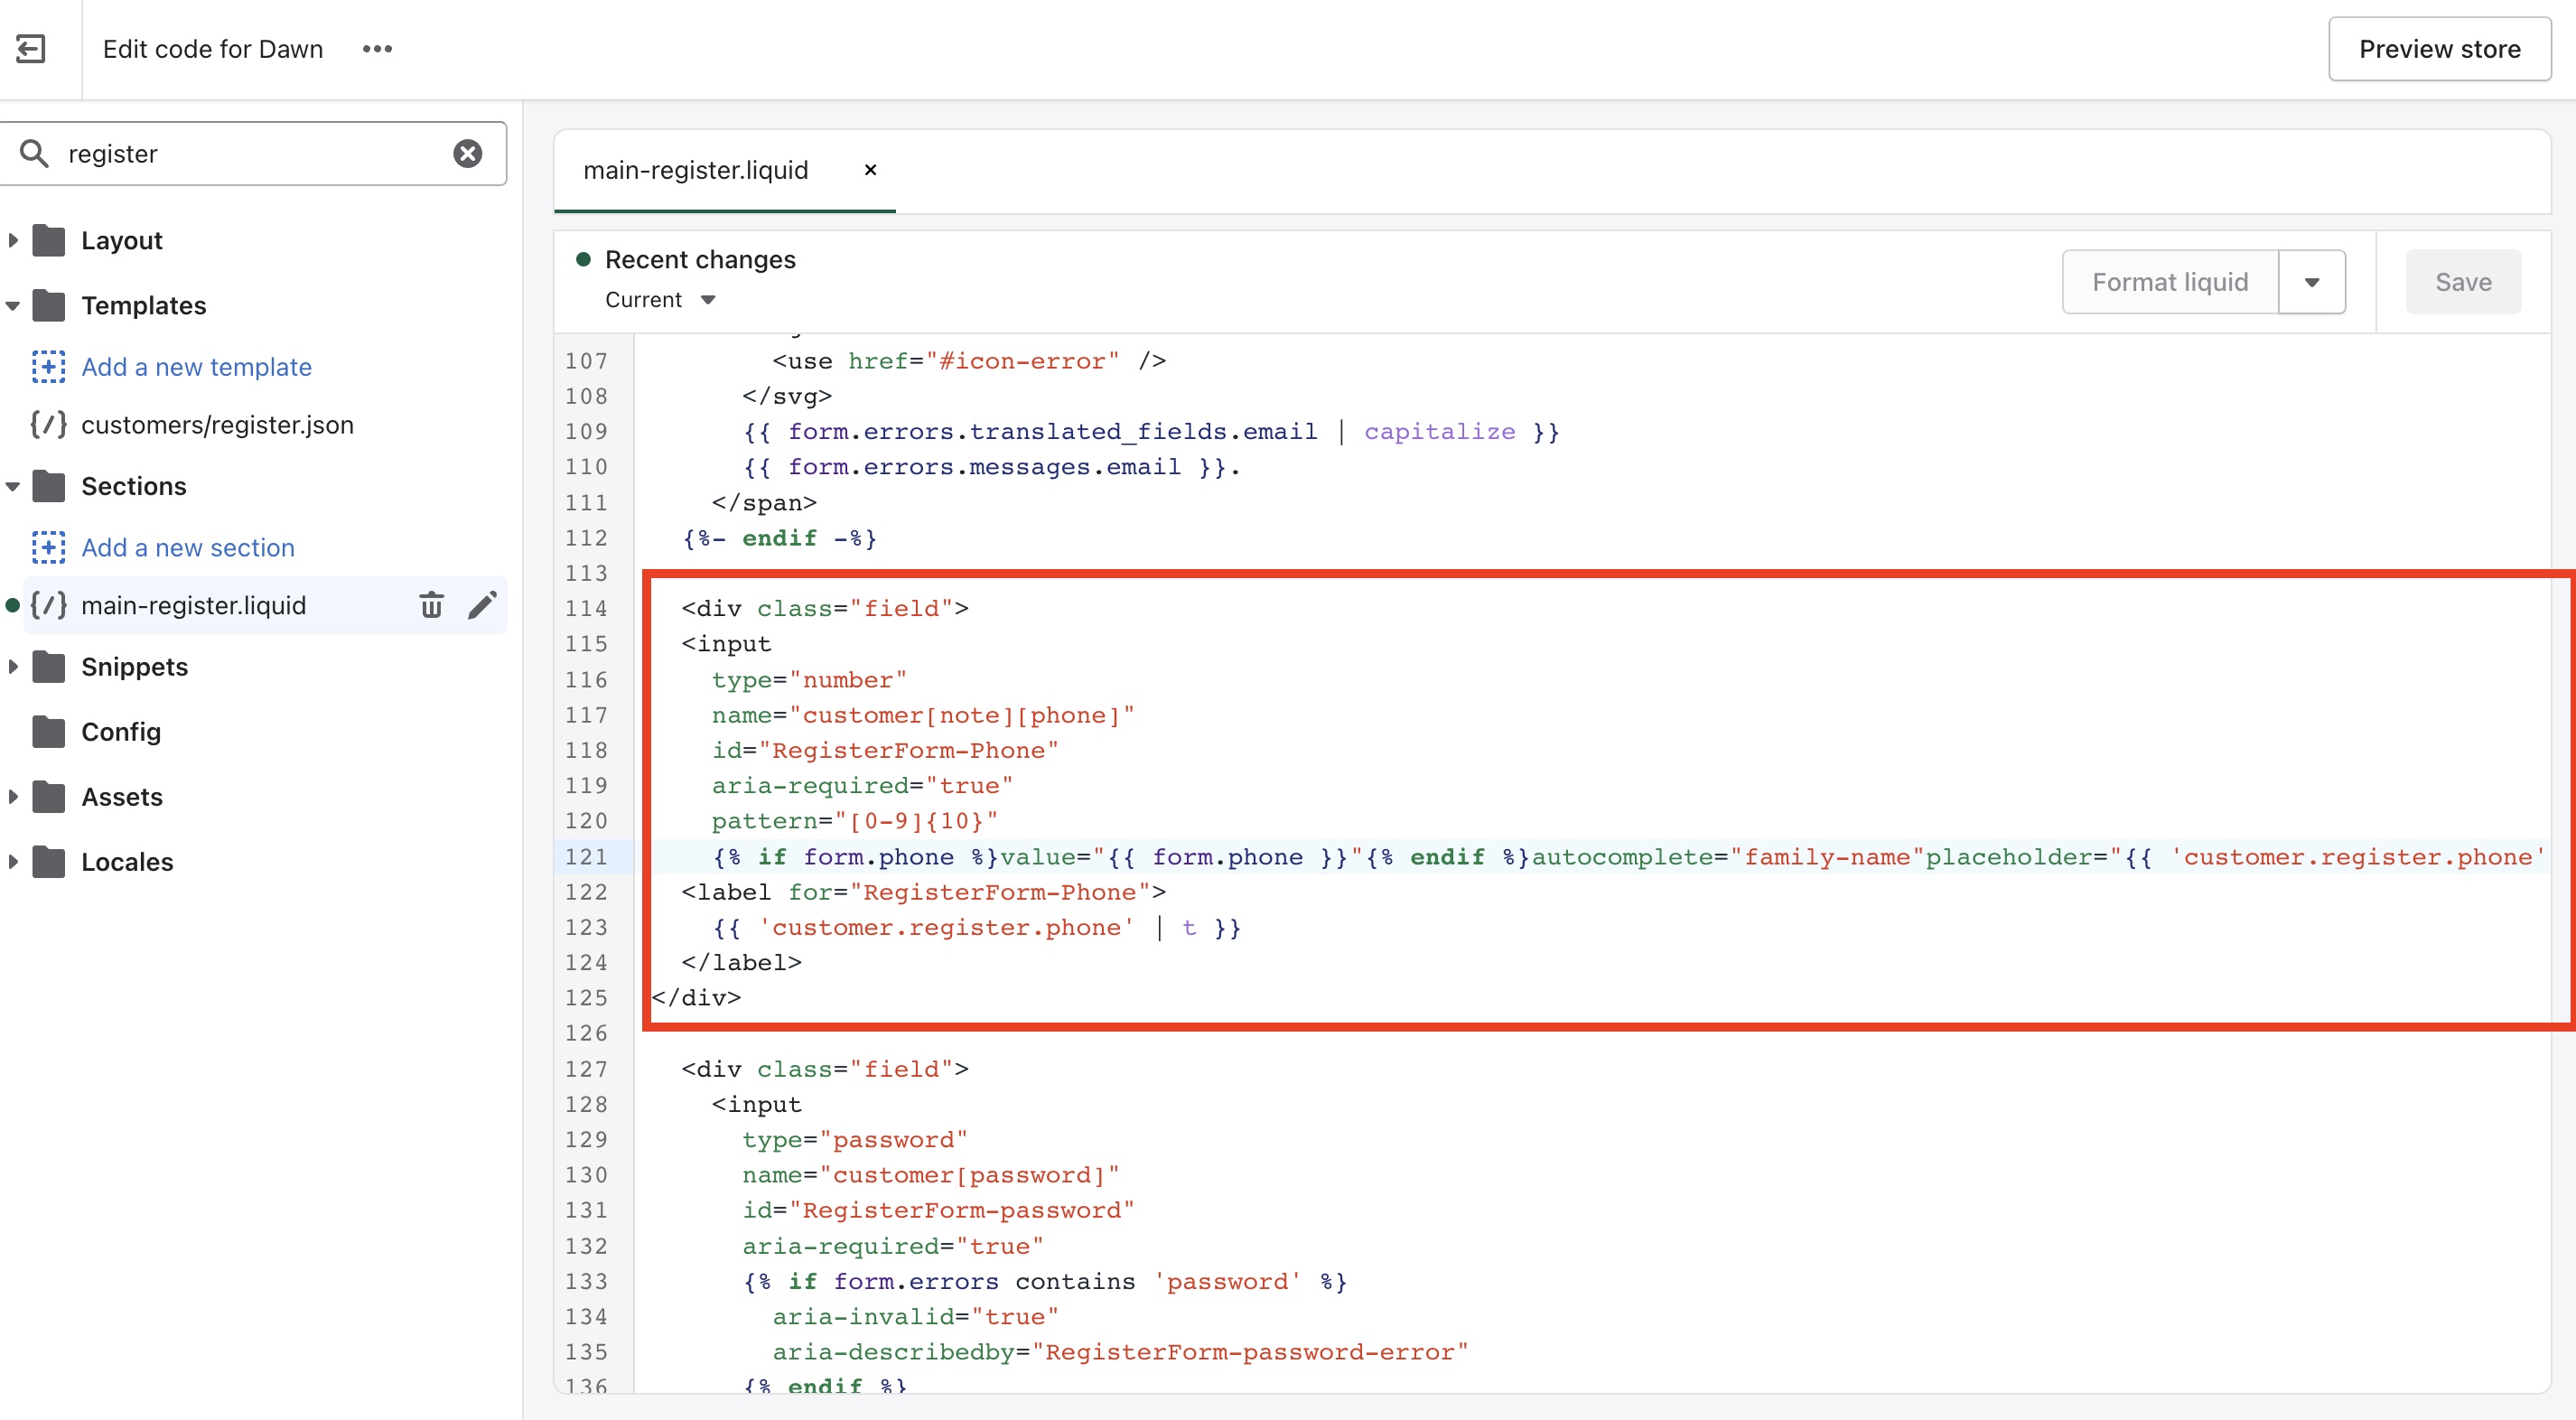
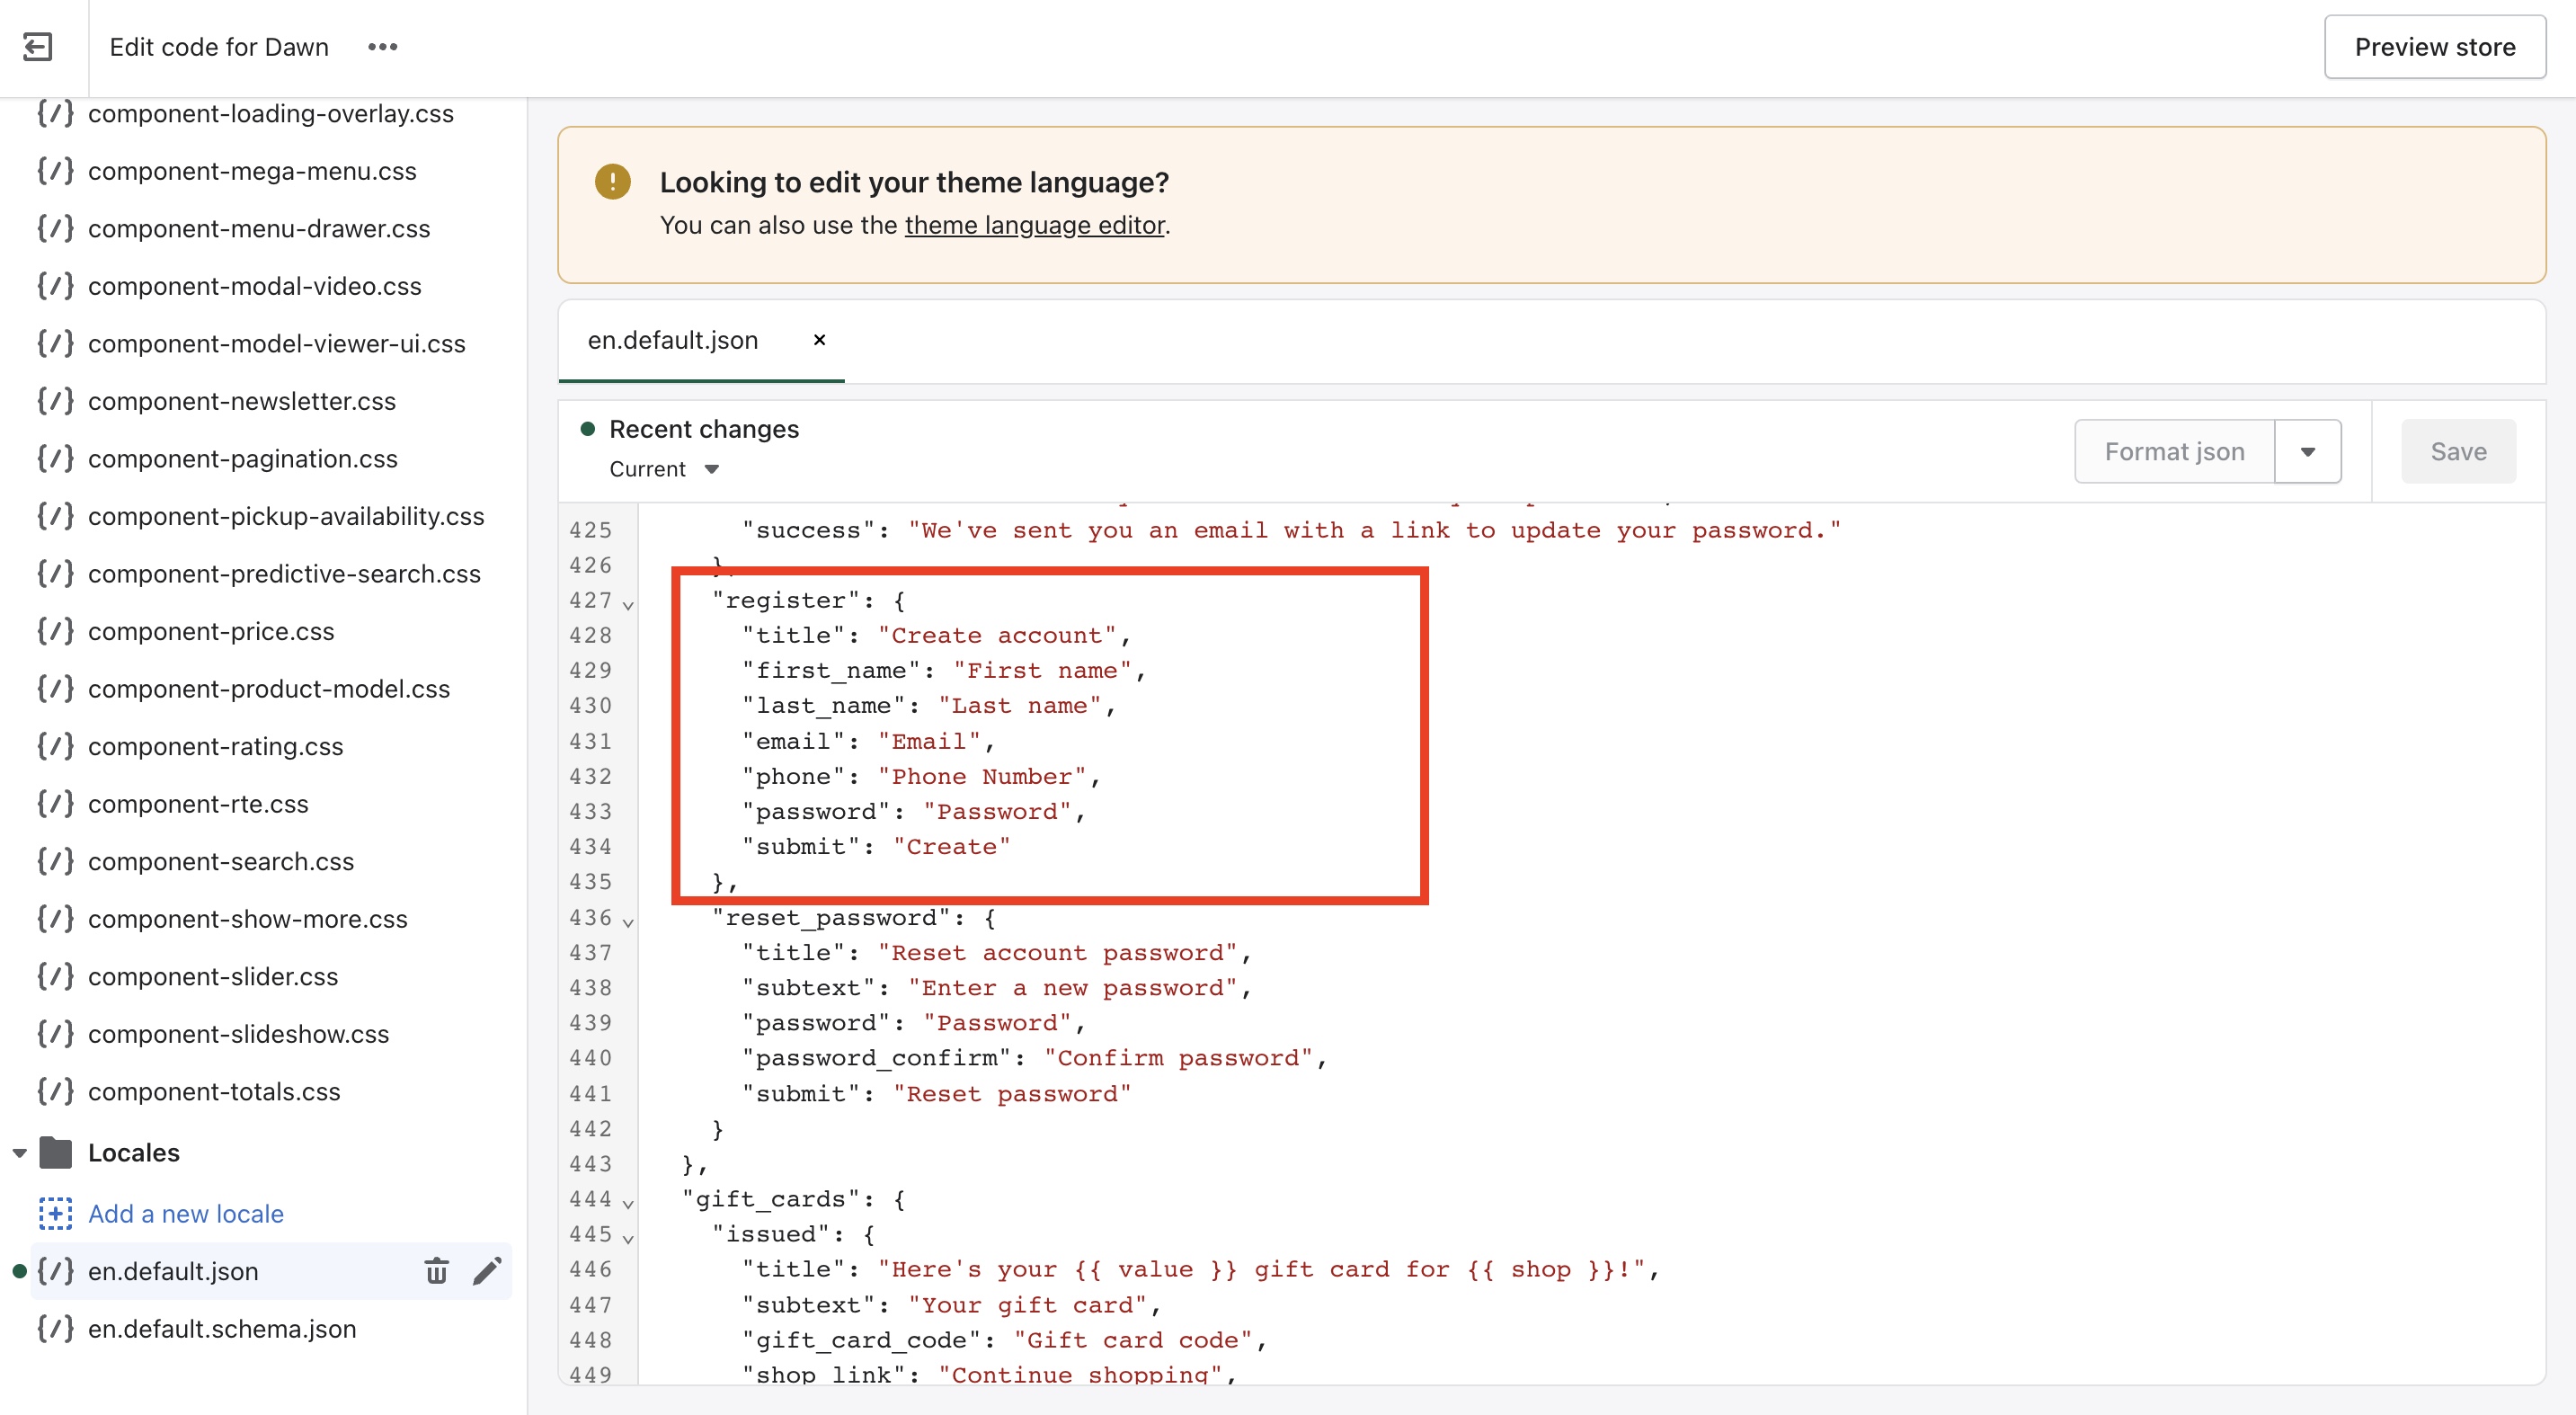
- To use Mobile no. as primary key, it needs to be added to the Registration form and customer register event.
- Phone field needs be added in the main-register.liquid file
- It also needs to be added in the language file - en.default.json
If you are capturing any additional information with the above listed Shopify events using a 3rd party plugin, please ensure they are dispatched using the standard Shopify method of Line items, if Yes, then our Plugin would auto-capture those as well.
Whenever any event is fired, along with the above event-specific parameters, the below-mentioned parameters will also be sent over to CEE by default.
- Browser Info
- Visit(New or returning)
- Time spent on Page
- Time spent on Site
- URL
- Previous URL
- NPV(Total Page Views)
- Webpage Title
For validation of events being sent over to CEE, head over to the Activity Dashboard(Insight > Dashboards & Reports > Activity Dashboard).

Custom Activity
In case you have other activities which you wish to track other than the predefined ones specified above, you can do the same with Auto Discovery .
Auto Discovery helps to track custom events without even requiring to configure those events over on CEE.
Follow the steps mentioned below for configuring Auto Discovery over on your Shopify Store -
- Copy the following code snippet.
smartech('dispatch', '<activity name>', <value in JSON>);

//Example
smartech('dispatch', 'Product View', {
    'productname': 'T-shirt',
    'size': 'M,
    'price': 999.10
});
- Once code copied and configured according to the activity you wish to track(Refer to the Example stated above), head over to your 'myshopify store' and then click on Online Store under 'Sales Channel'.

- Once on the page(As shown in the image above), click on 'Actions' on the right hand side and then select 'Edit Code'.

- Once on the 'Edit Code' page, you will be able to see folders with the name of Layouts, Templates, Sections, etc. (If not able to see 7 folders at one go, then minimize the expanded folders).
Click on Snippets Folder.

- Click on 'Snippets' folder and click on Add a new snippet(You can give any name to the snippet). Once the new snippet is added(As can be seen no the above image with 'smartech.liquid' name), paste the copied code(refer to point 1) over to the newly added snippet.
Note - Do add

- Now head over to the Layout folder and click on theme.liquid. Over there add the following text - {% include 'smartech' %}(Smartech is just for reference. Put the name you gave to the newly added snippet). Add the text to the ninth line of the code.
Once done click on save to enable tracking of the custom activity.
Guest Checkout
1. User Identification after Complete Guest Checkout process
- For Shopify Websites, customers can do checkout even if he/she is not logged in. This we consider as 'Guest Checkout.'
- For Guest checkout the user needs to enter his/her Email Id/Mobile Number and shipping details in order to do checkout as a Guest.
- In the above scenario, CEE identifies the user with the help of their entered email id, thus turning the user into an identified user from an anonymomus one.
2. User Identification via API on Checkout Form completion
- Guest users can now be identified even before the checkout step.
- Whenever a guest user fills the user details form before the checkout step, an API is called which communicates the user's primary key i.e. their email ID to the CEE panel.
- Hence, classifying the user as an identified user.
- Post this step all the user activities will be attributed to the corresponding identified user, even if the user abandons the cart after this.
3. Capturing mobile number for users doing guest checkout
- When a user fills up the form for guest checkout and provides the mobile number in the shipping address details, you now have the option to track this number as user's mobile attribute.
- If the user abandons the cart - this functionality will update user's mobile number attribute basis the abandoned cart event. This will help you send cart recovery SMS to the users who abandoned the cart.
- If the user completes the purchase, the data would get updated as above mentioned in point #1.
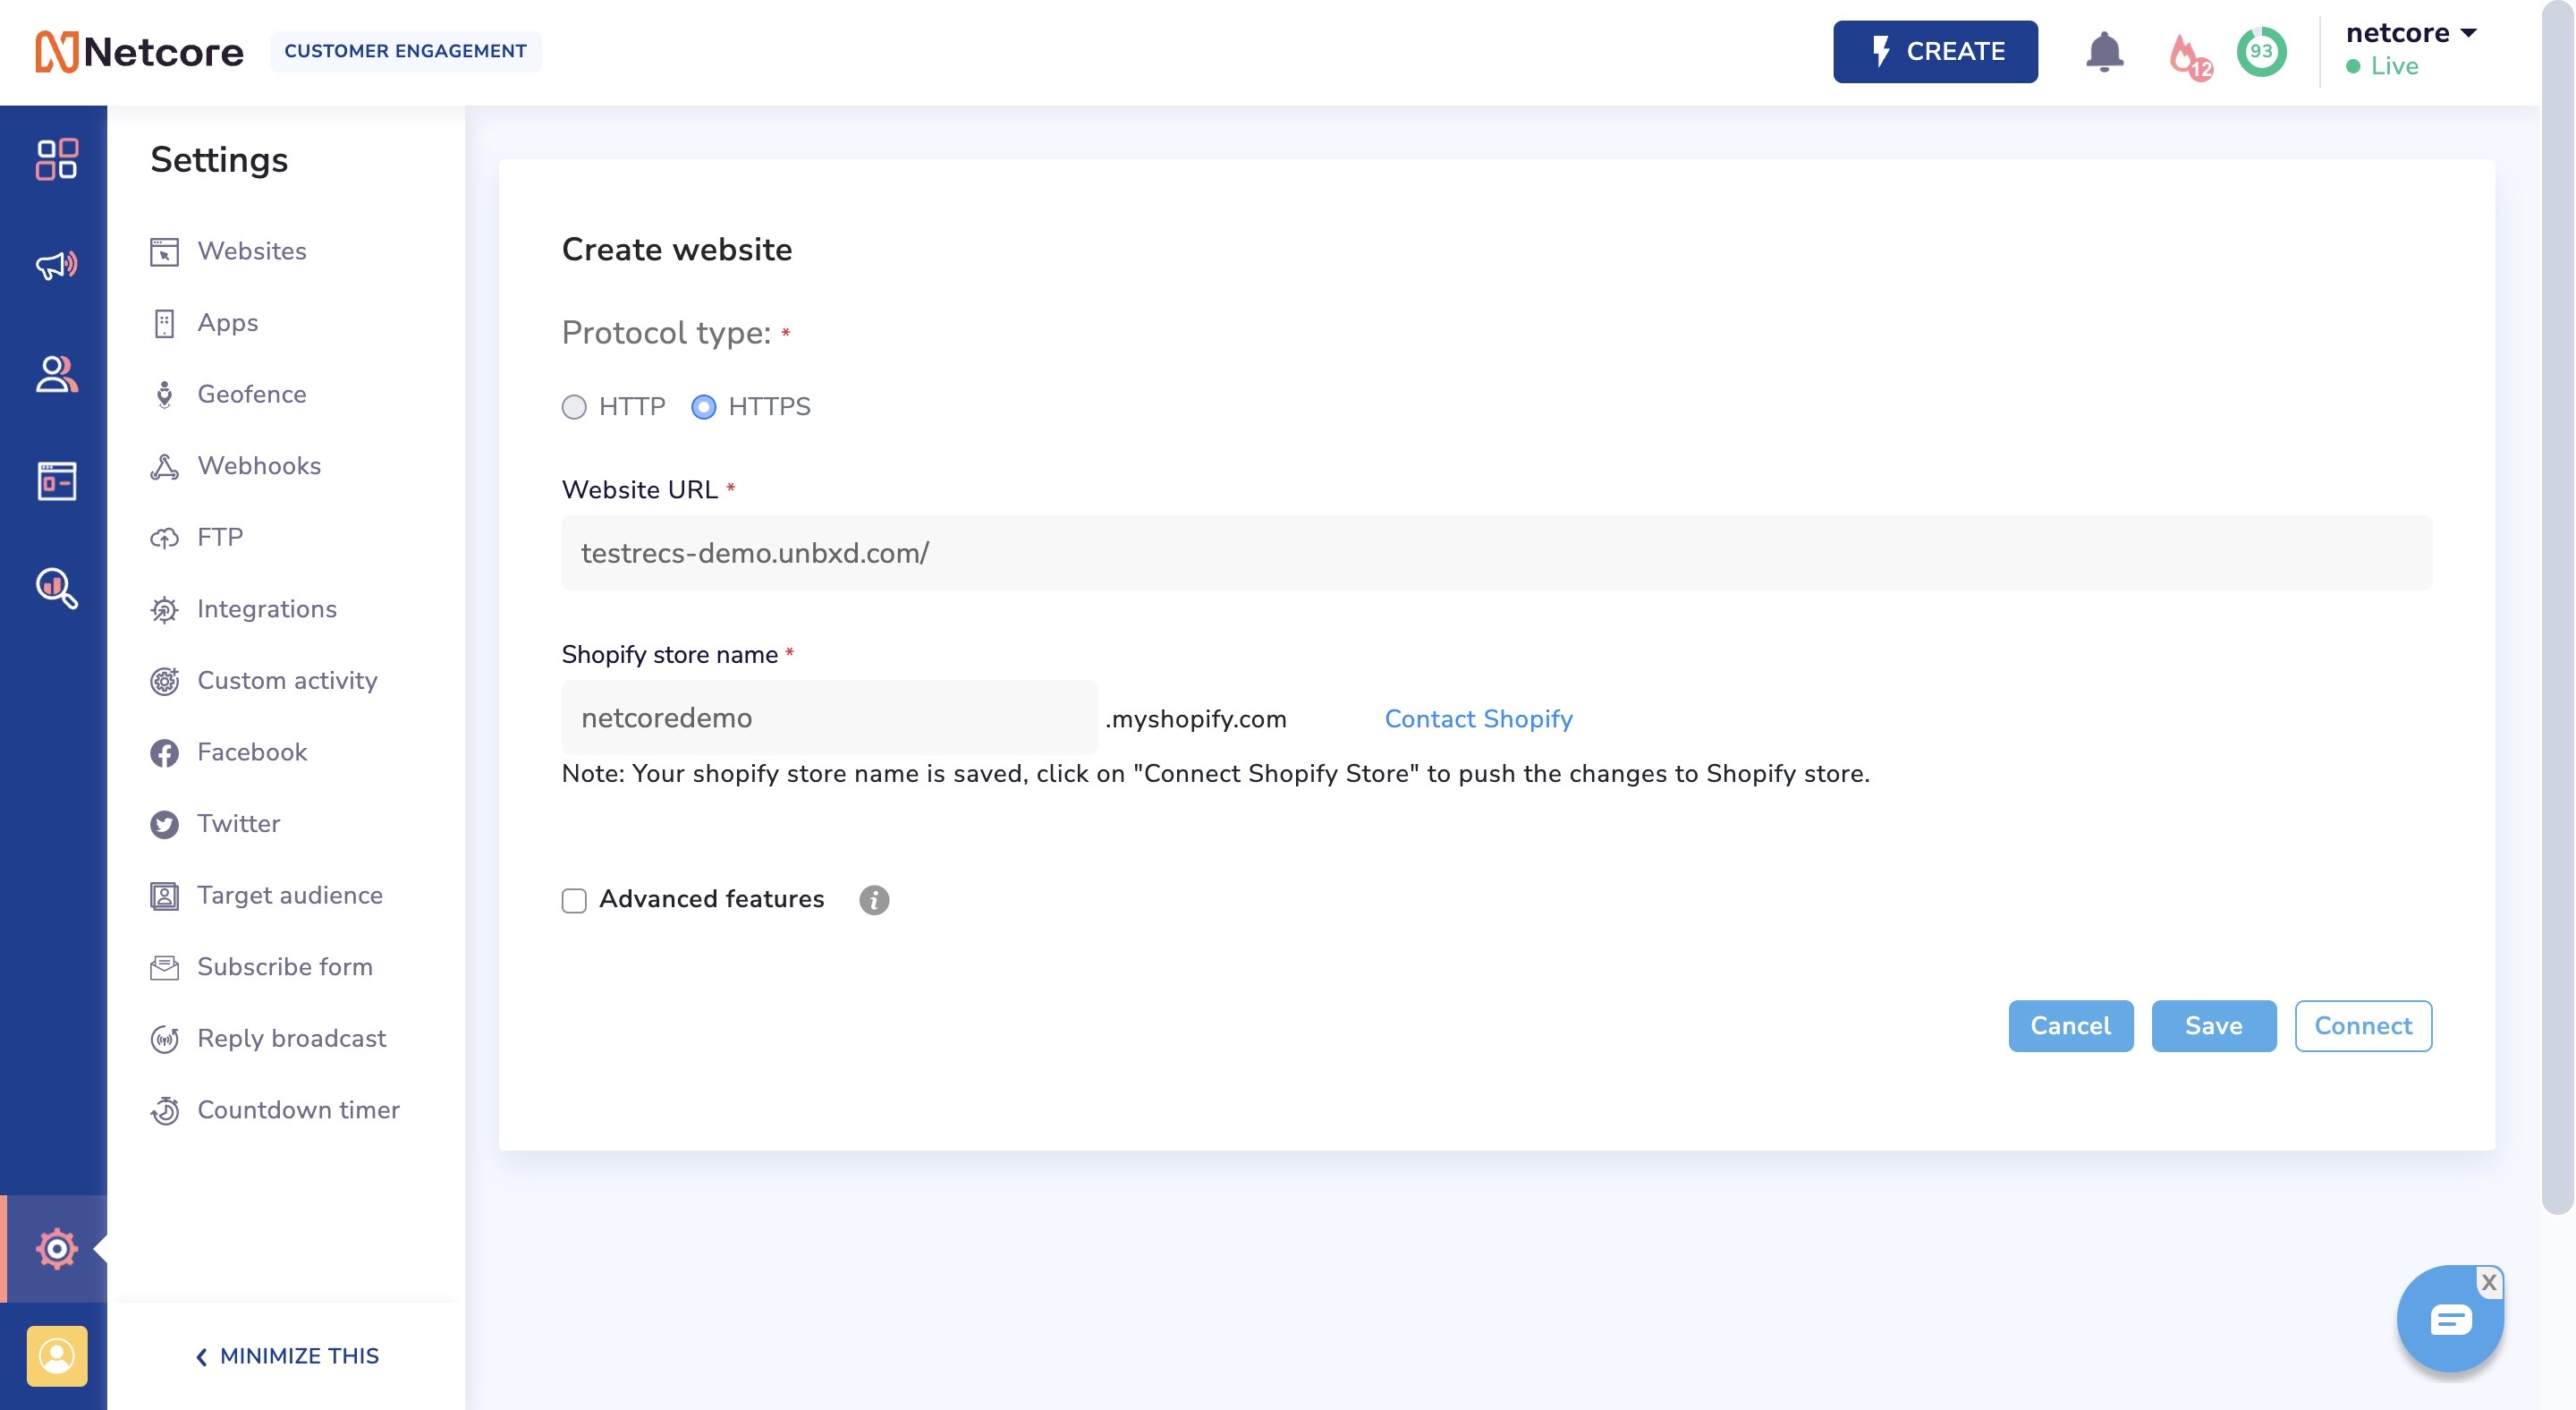
- In order to enable this option, head over to the Web assets section and edit the Shopify website asset. Click on Connect or Re-connect Shopify option and select "Sync Shipping mobile number as an attribute" as shown below.

Email ID in case of Shopify by default is considered as Primary Key.
It is also supported on m-sites.
Updated 17 days ago