App Push Notification
Overview
- Drive engagement with customers through Push notifications
- Connect with your customers through timely and relevant notifications
- Deliver contextual push notifications whilst breaking through the clutter
Click here to know about Android SDK Integration.
Setup
In this section, you will specify basic campaign details and conversion rules.
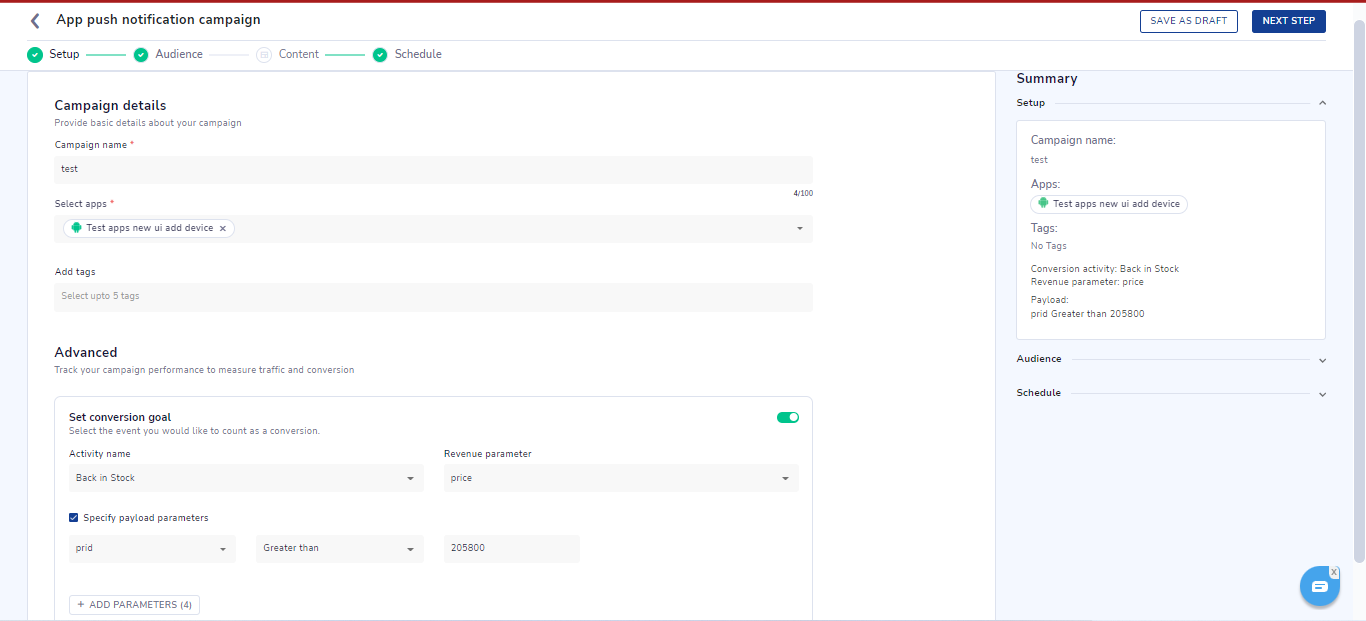
This 'Setup' section consists of:
Campaign details
- Campaign name - Give a suitable name for the campaign. Allowed characters are 0-9 a-z A-Z - _ & @. The maximum character limit is 100.
- Select apps - Select the apps from the drop-down list where you want to send the push notifications.
- Add tags - Add tags to categorize campaigns. Tags will help you quickly search campaigns on the listing page.
Advanced
You can set conversion goals here by enabling the toggle.
- Activity name - Select the activity which you want to consider as a conversion.
- Revenue parameter - You can add the payload parameter from the selected activity that represents the revenue value for your business.
- Specify payload parameter - Add up to 5 specific conditions for the payloads of the specified conversion event.
Click on 'Next Step' button to go to Audience section.
Audience
The audience section allows you to choose the target audience for your app push notification campaign.
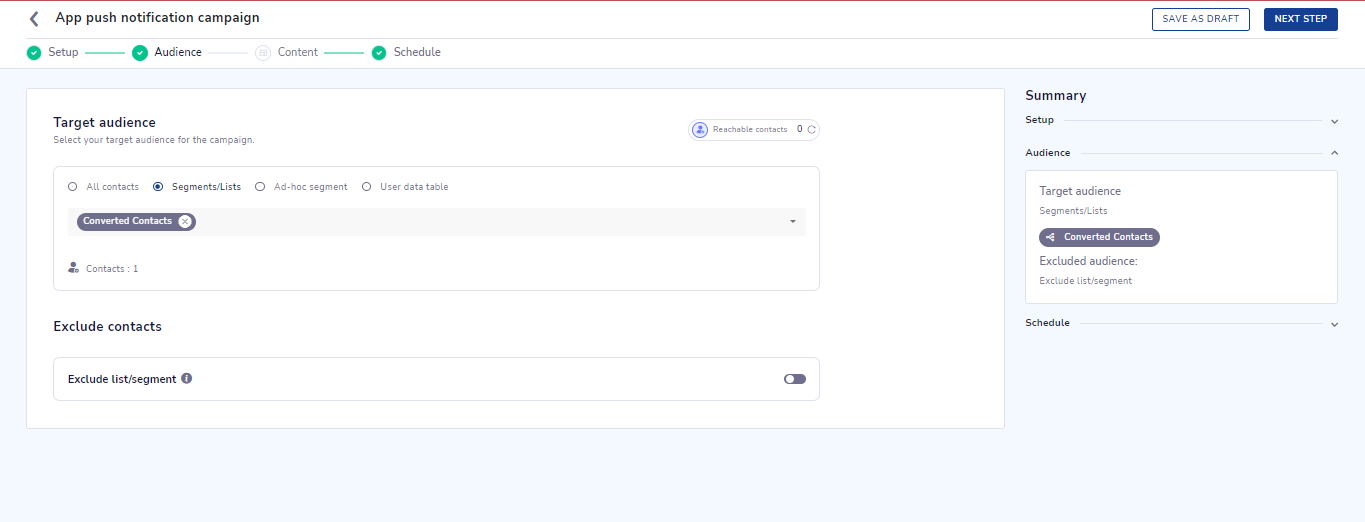
You have the following options to choose from:
-
All contacts - Select this if you want to send the campaign to all reachable users of the selected app.
-
Segments/Lists - Here, you can select up to 5 segments or lists created in the Contacts section.
-
Ad hoc segment - Here, you can specify ad hoc segment conditions on-the-fly for your target audience. Please note: Such ad hoc segment will not be saved in the Contacts section but rather used only for this campaign.
-
Exclude contacts
You can also exclude a specific set of users from receiving the notification campaign. You can create a segment of such users or upload a list in the ‘Contacts’ section as ‘Suppression segment/list’ and select the same here in the audience section.
Please note: You can select upto 5 suppression segments or lists for a given campaign.
Click on 'Next Step' button to go to the Content section.
Content
After the basic setup and defining the target audience, 'Content' is the section where all the action happens!
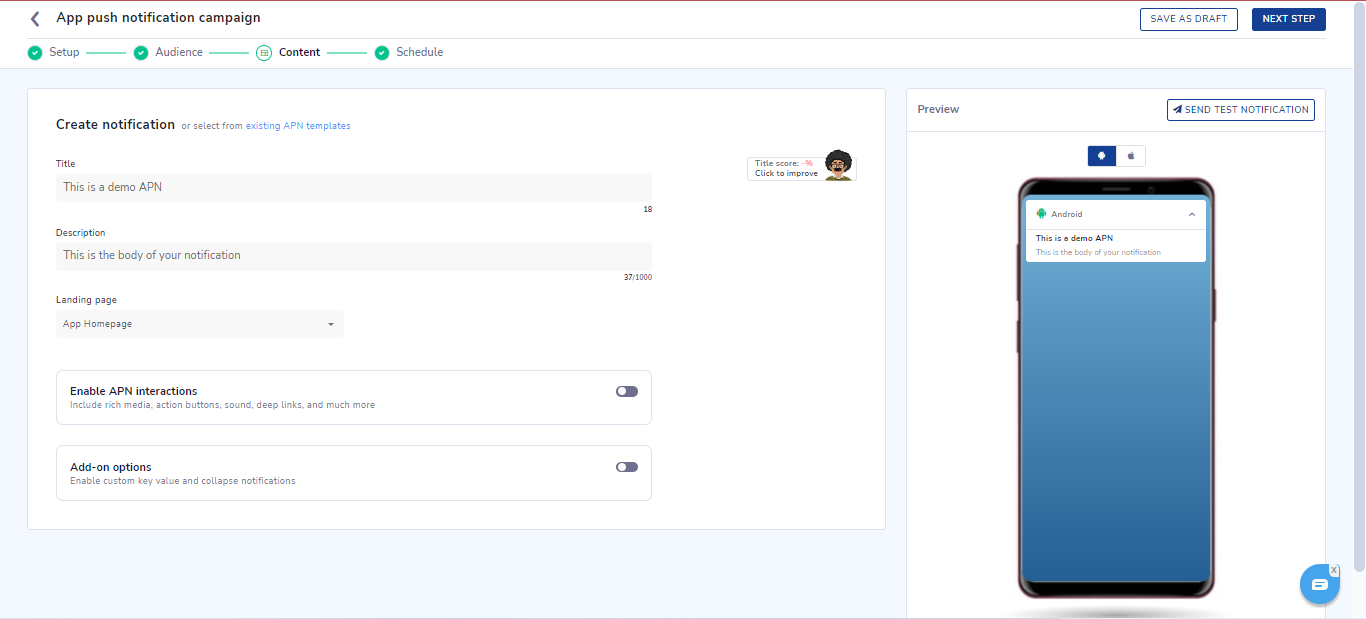
- Title - Add the title of your push notification. You can also add formatting such as bold, italics, underline, text color, text background color, subscript, and superscript here. However, text formatting is supported only on Android SDK.
- Description - Add the message content of your push notification. You can also add formatting such as bold, italics, underline, text color, text background color, subscript, and superscript here. However, text formatting is supported only on Android SDK.
- Landing page - You can choose the app homepage, deep link, or URL as a landing page for your push notification. This value is used for redirection when the user clicks anywhere on the notification.
Enable APN interactions
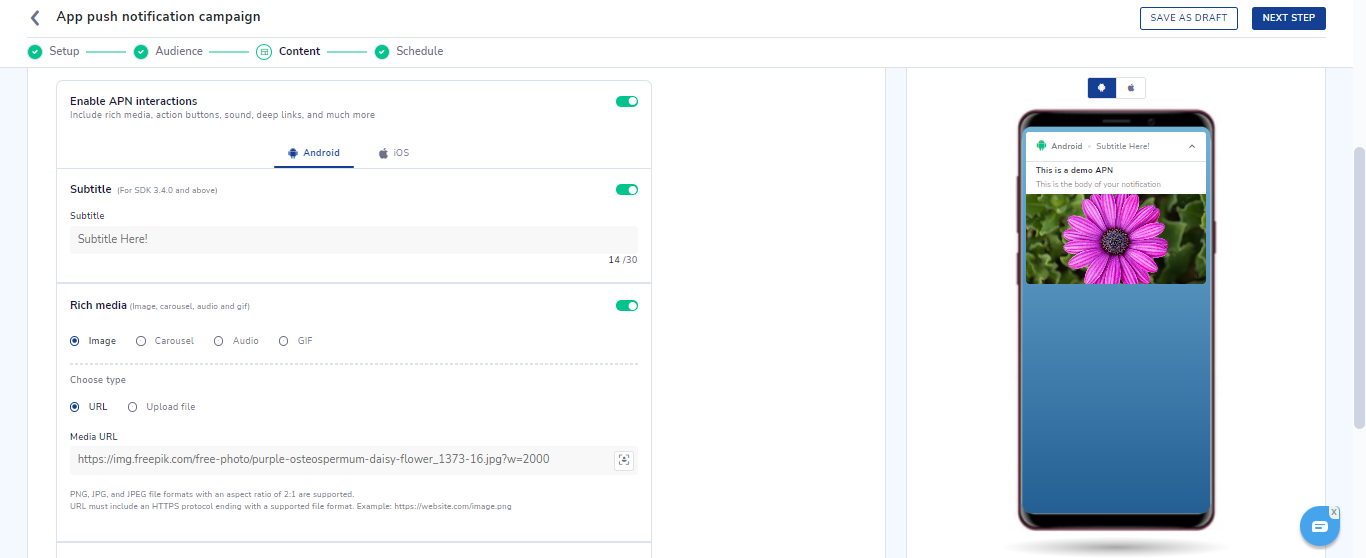
Here you can add and customize amazing interactions to your android or iOS notification content. These options are mentioned below:
-
Subtitle - You can add a subtitle to your notification. You can also add formatting such as bold, italics, underline, text color, text background color, subscript, and superscript here. However, text formatting is supported only on Android SDK.
-
Rich media - You can add 4 types of rich media to your notification:
- Image - An image can be added using a URL or directly uploading an image from your system for both
Android and iOS. - Carousel - A slideshow of multiple images. For each slice in a carousel, you can add an image, title, CTA, and a deep link URL.
- Audio, Video & GIF -To add either of these three rich media, only the URL needs to be provided.
Please note: Video is not available for Android.
- Image - An image can be added using a URL or directly uploading an image from your system for both
Note
Supported file formats:
- Image supported formats - .jpeg, .jpg and .png with max 40KB size. Image should be in 2:1 aspect ratio
- Carousel supported formats - Maximum of 5 slide images of format .jpeg, .jpg and .png with max 40KB size for carousel slice images. The landscape carousel image should be in 2:1 aspect ratio and the portrait carousel should be in 1:1 aspect ratio
- If you wish to use larger size images, you can provide the self-hosted image URL.
- Audio supported formats - .mp3, .aiff, and .wav with max 3MB size.
- Video supported formats - m4v, .mp4, and .mov with max 3MB size and 2:1 aspect ratio
- GIF supported formats - .gif with max 3MB size, 2:1 aspect ratio & upto max. 10 frames (rendering performance may vary from device to device)
Recommended Character Limits:
- Max 50 characters for Title and 1000 characters for message.
- Max 30 characters for Title and 50 characters for message for each carousel image slide.
- CTA URL - Maximum character limit is 1000.
-
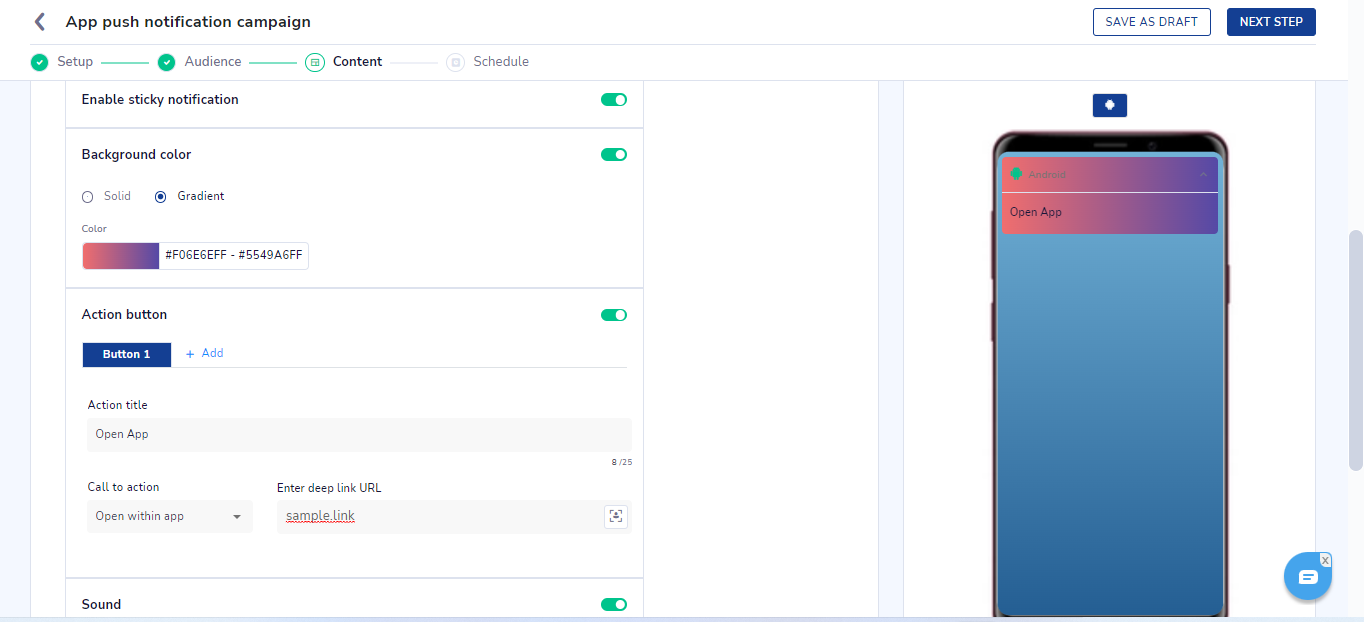
Enable sticky notification - Enabling this feature would pin your notification in the notification tray of the device. Such notification will not be cleared by swiping it out or the 'clear all notifications' button. It can only be dismissed by clicking on provided x icon.
-
Background color - You can add background color to your notification as well as customize the degree of opacity of the color. You have the option to add a solid color or use a gradient option where you can define a two-colored gradient effect with a customizable angle setting.
Please note: Background color support is available only from Netcore Android Base SDK 3.2.30 & Android Push SDK 3.2.16 onwards
Examples of how you can turn your daily notifications more attractive, vibrant and attention grabbing!
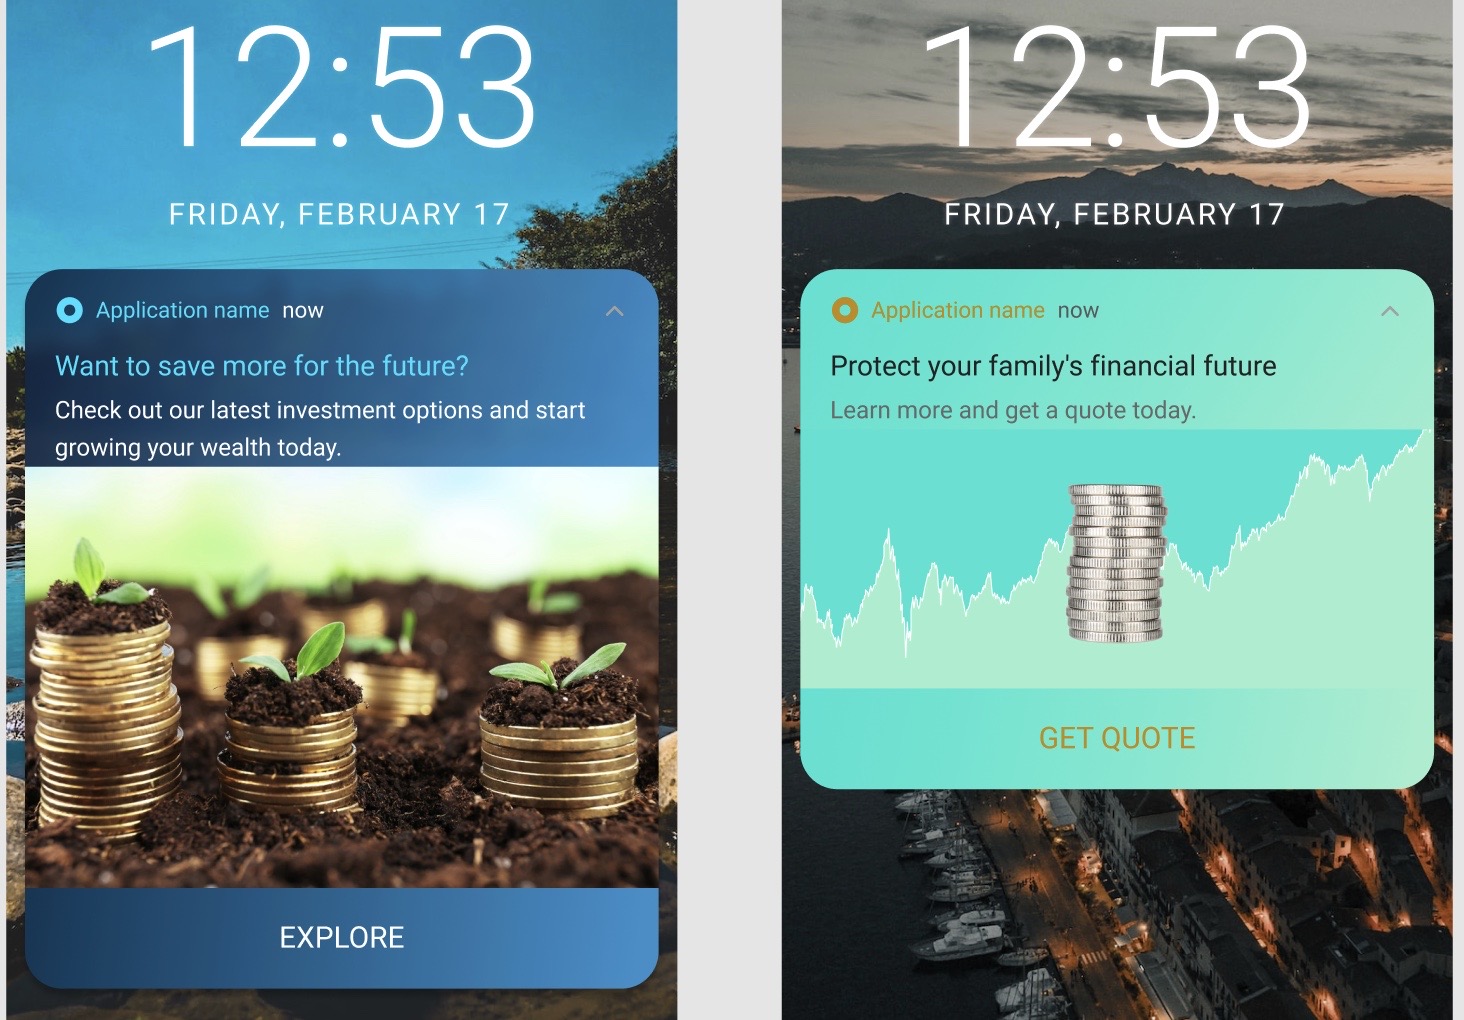
Examples of BFSI industry
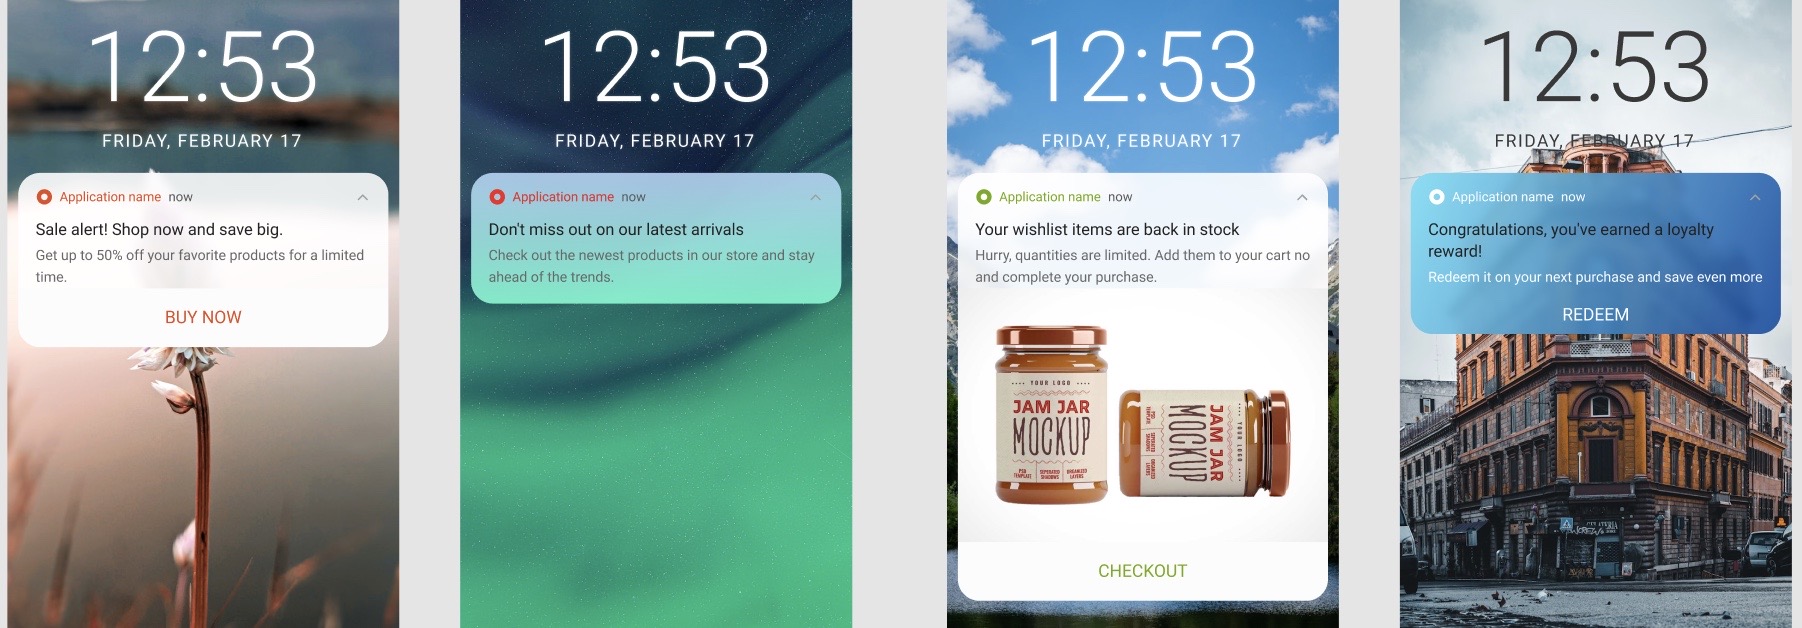
Examples of E-commerce industry
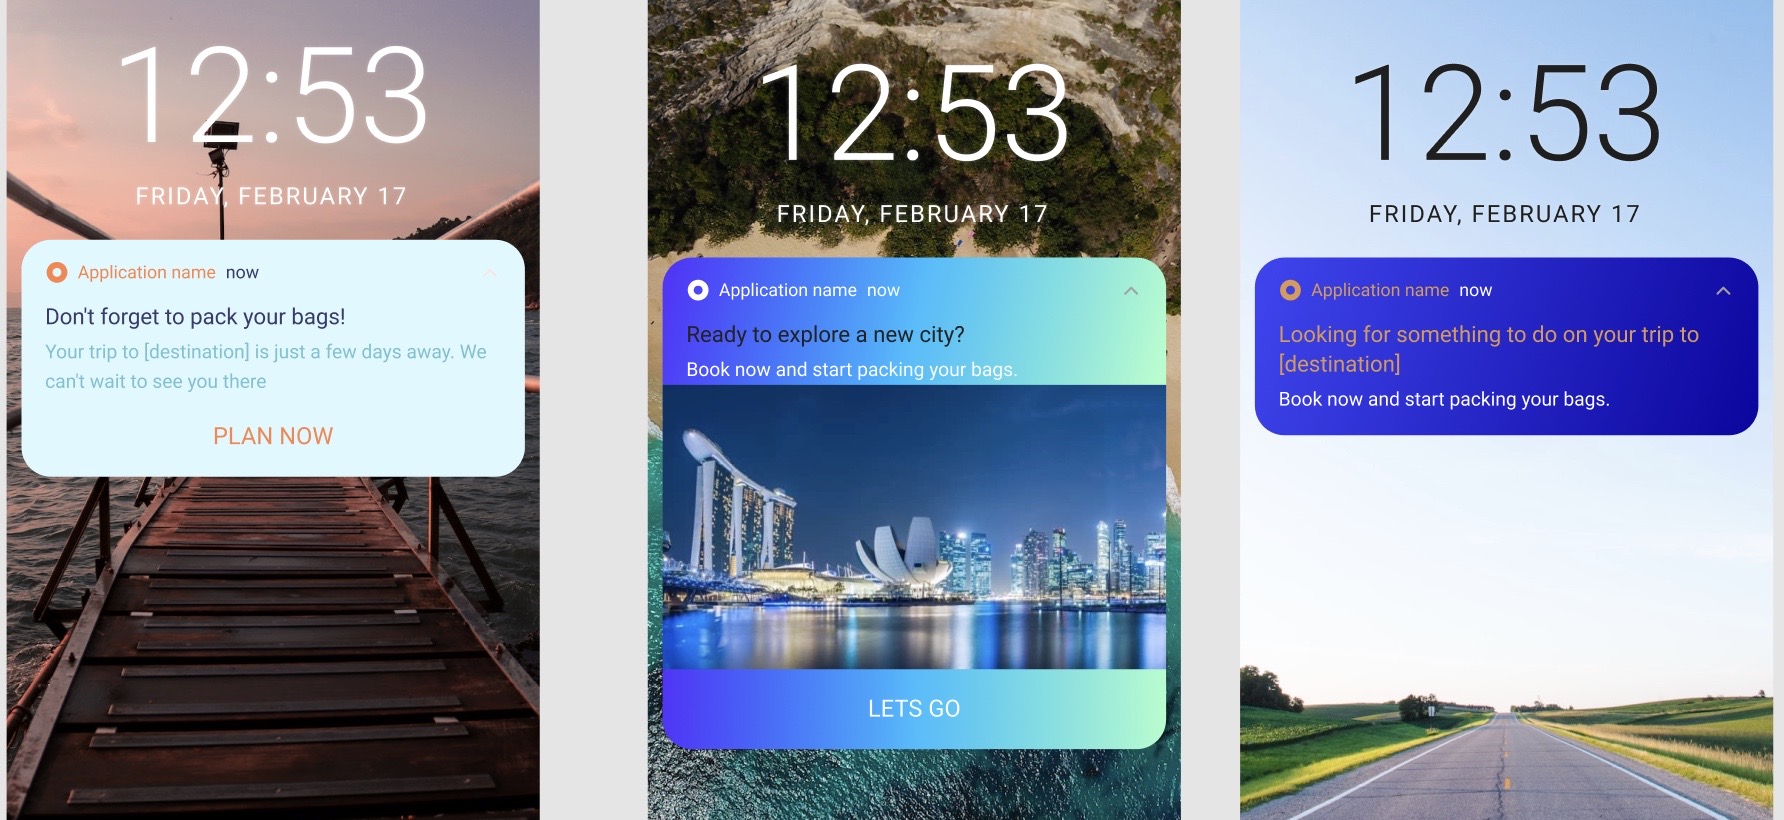
Examples of Travel industry
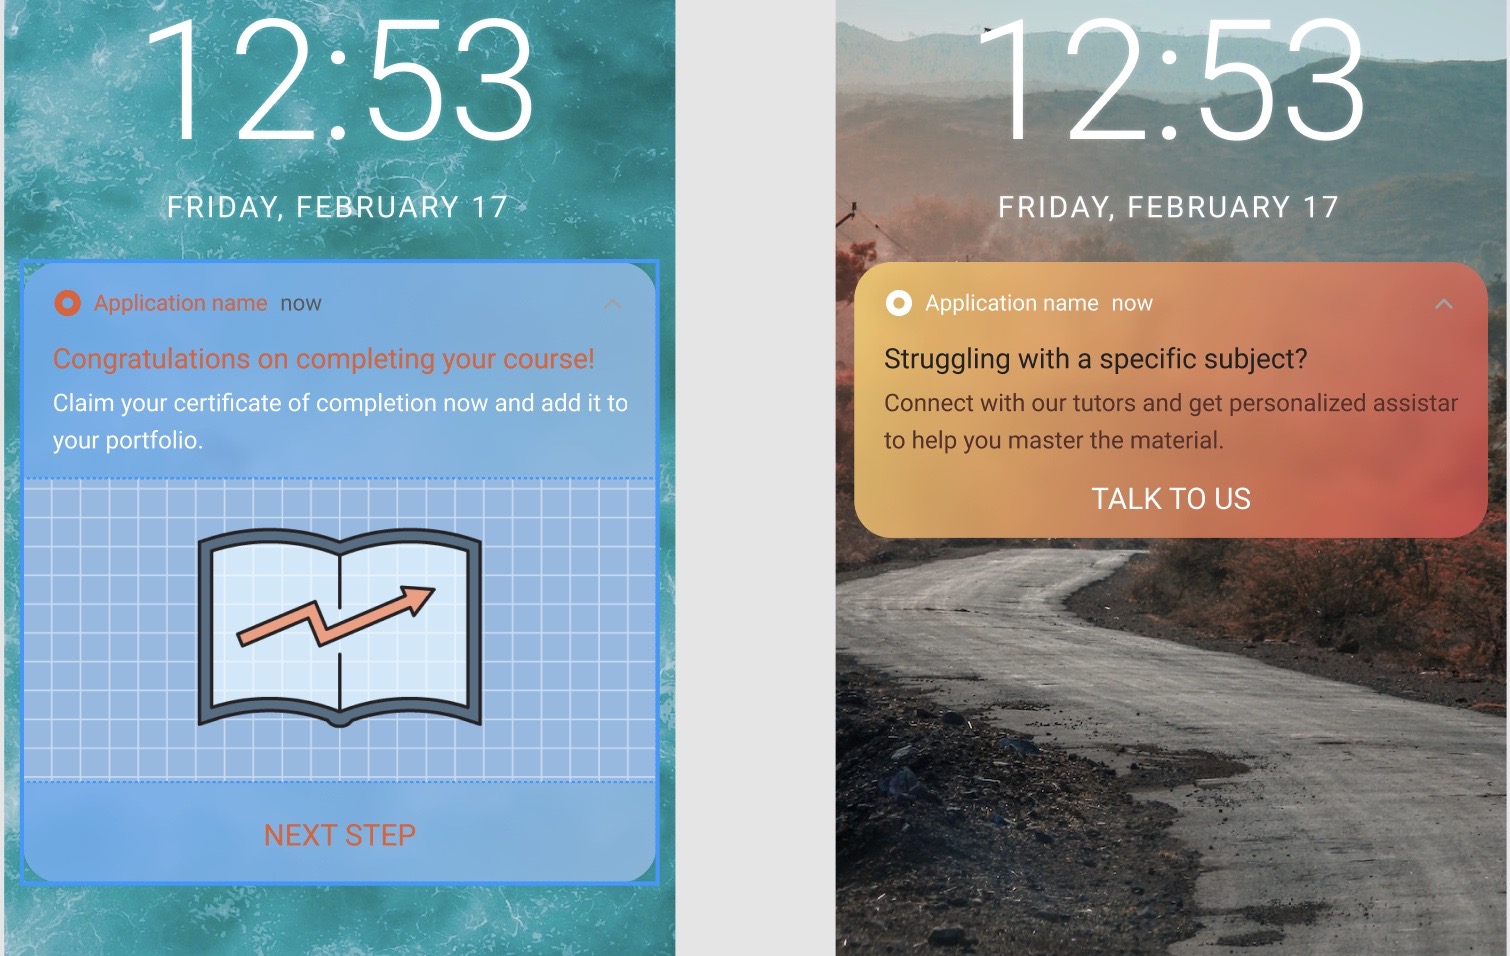
Examples of Ed-tech industry
- Action button
A maximum of 3 Action buttons can be added for push notification which consists of- Action button title
- Call-to-action - Open within app, Open in browser, Close, Copy text, Remind me later.
- URL or deeplink needs to be provided when open within app or open in browser option is selected above
- For Copy text action - you can specify the text to be copied. This text can also be personalized
- For remind me later action- you can specify reminder time. The notification will be dismissed and show again once this reminder time is reached when user clicks on this action button.
The content Preview is available on the right side of the screen.
- Sound
Here you can define the message tone played when a notification gets delivered to the device. You have the option to play the default device sound or a custom sound.
Below are the specifications for Sound file name that you need to enter for the custom sound field.- Android versions below version 8 : - Specify the name of the sound file which is included in your app bundle. Supported file formats are .mp3, .ogg, .wav.
- Android versions 8 & above - Specify the name of the notification channel id. Refer to SDK integration documentation to know how to setup notification channel
- iOS - Specify the name of the sound file which is included in your app bundle. Supported file formats are
.aiff, .wav, or .caf.
Please note: Sound file name that you are entering must be present in the app bundle. If not present, the default sound as per the user's device will be played.
Add-on options
- Collapse Notification
Collapse_key is a default key used by FCM and APNS for purpose of updating already delivered older notifications. When there are multiple notifications having the same collapse key, only the latest notification will be shown in the user's notification tray.
For example, you can set score_updates as the collapse key for a series of notifications relaying match score updates and this will ensure only the latest notification is kept in the user's notification tray.
- Custom Key - value
In this section, you can specify OS-specific custom key-value data. These key-value pairs will be available at the app level when a notification is clicked by the user. You can have further internal logic built at app level on top of these key-value pairs if needed.
Test Campaign
You can send a test push notification to users either based on the push token id or based on the primary key. The system will not consider test push stats in the campaign reports
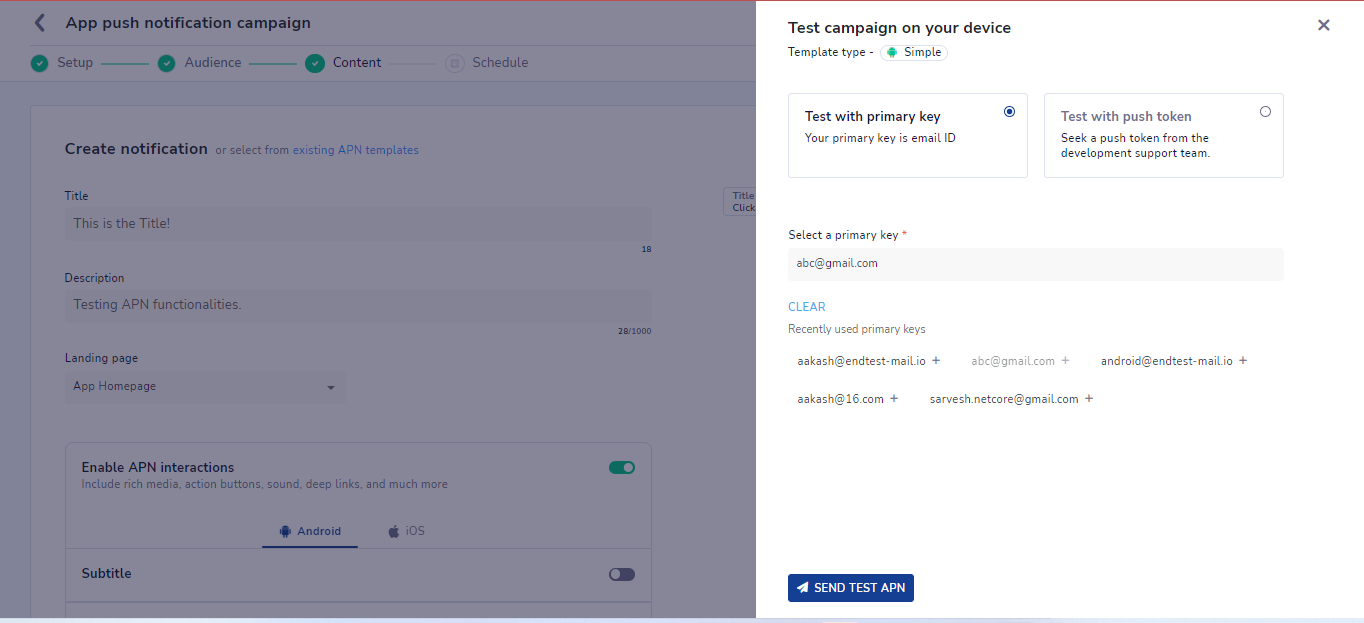
Click on 'Next Step' button to go to the Schedule section.
Schedule
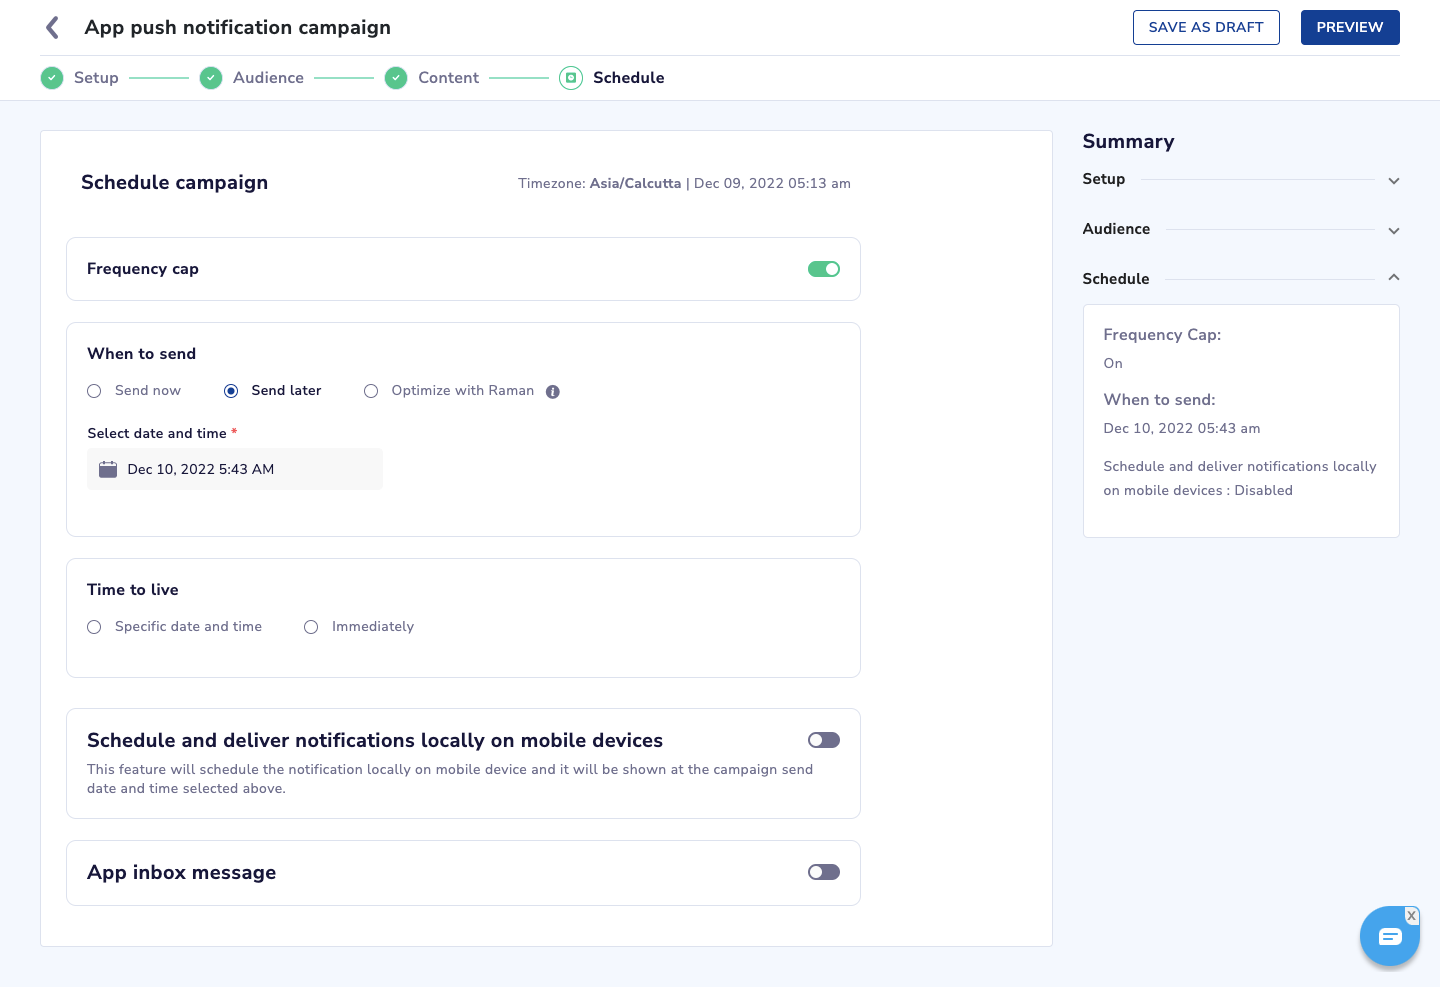
In this section, you can specify scheduling conditions for your app push campaign. There are 3 ways in which you can send your broadcast campaign which is described below:
-
Frequency capping - You can decide whether or not to keep frequency capping enabled for this campaign. Please ensure to enable frequency capping from the account configuration section of your Netcore CE panel.
-
When to Send
- Now - Use this option if you wish to send the broadcast campaign right away.
- Later - Use this option if you wish to schedule the broadcast for a later date, set the date and time accordingly.
- Optimize with Raman - Using this option will send the APNs to each user at their preferred hour using Netcore's Send Time Optimization feature. You can also select a Control group for this and select the time at which they will be sent the notification.
-
Time to Live - TTL defines the validity of your notification and it corresponds to the maximum period of time for which FCM stores and attempts to deliver the message. You can define TTL in two ways :
- Specific date and time - You can specify the TTL value with a specific date and time with a max of 28 days in the future.
- Immediate delivery - When this option is selected - the TTL value is set to 0 seconds and FCM would treat it as immediate delivery on a now-or-never basis. Such notifications are not reattempted by FCM. You also need to provide a campaign cut-off in this case.
-
Schedule notifications locally on the users' devices
When enabled, this feature will schedule push notifications locally on your users' devices. This is a great feature that can help you boost delivery rates where you can reach almost 100% of your 'active' user base - active users are the users who came online during the duration when the campaign is scheduled to when it is supposed to render on the device. In such case, notification can get delivered via FCM as well as via Push amplification when a user comes online during the given duration. So it is always recommended to schedule the campaign well in advance to get the maximum benefit as you would've more active user base.In order to use this feature, you must schedule your campaign 24 hours in advance. Please note that local notifications stored on the user's device cannot be recalled when you suspend the campaign.
-
App Inbox - You can also send a copy this push notification to the App inbox, to know more click here:
Once your scheduling is complete, click on 'Save & Preview'
Preview
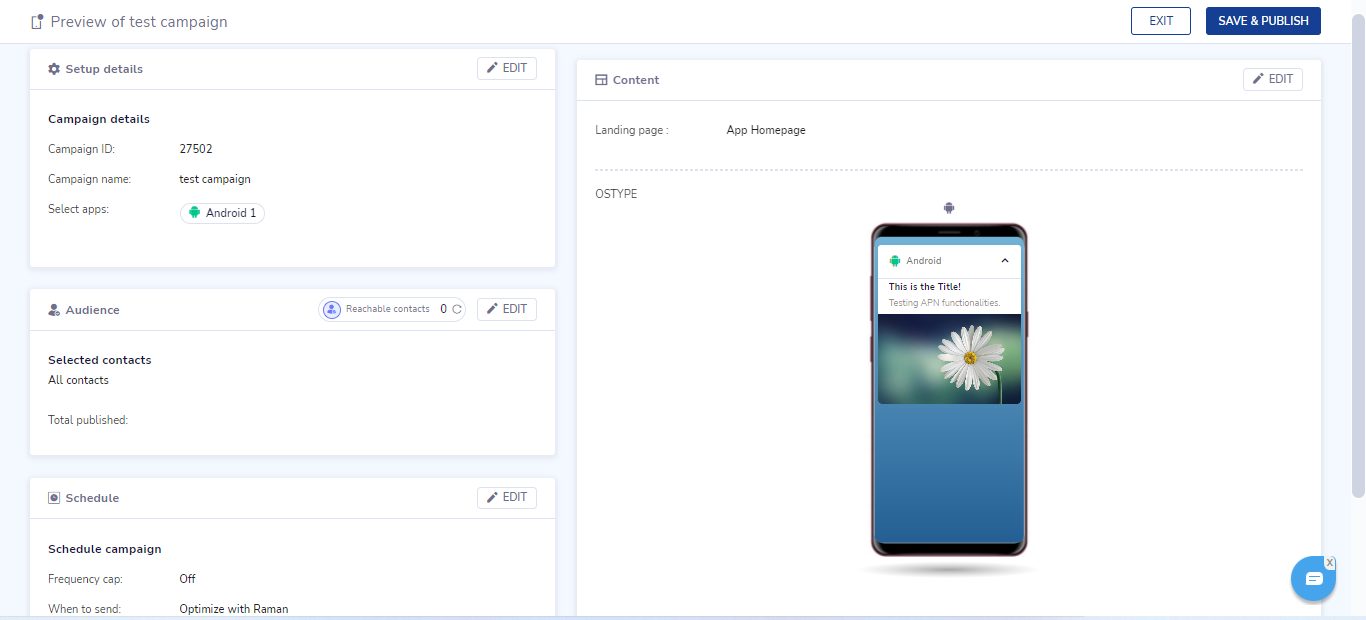
Here you can review the campaign in a summarized format. You can always go back and edit specific sections of the campaign. If there are no changes required, you can simply go ahead and publish the campaign.
You can view the reports of the broadcast in the unified campaign listings section.
Analyzing campaign performance
You can visit the unified campaign listings section on your Netcore panel where you can find a summarized view of all app push campaigns.
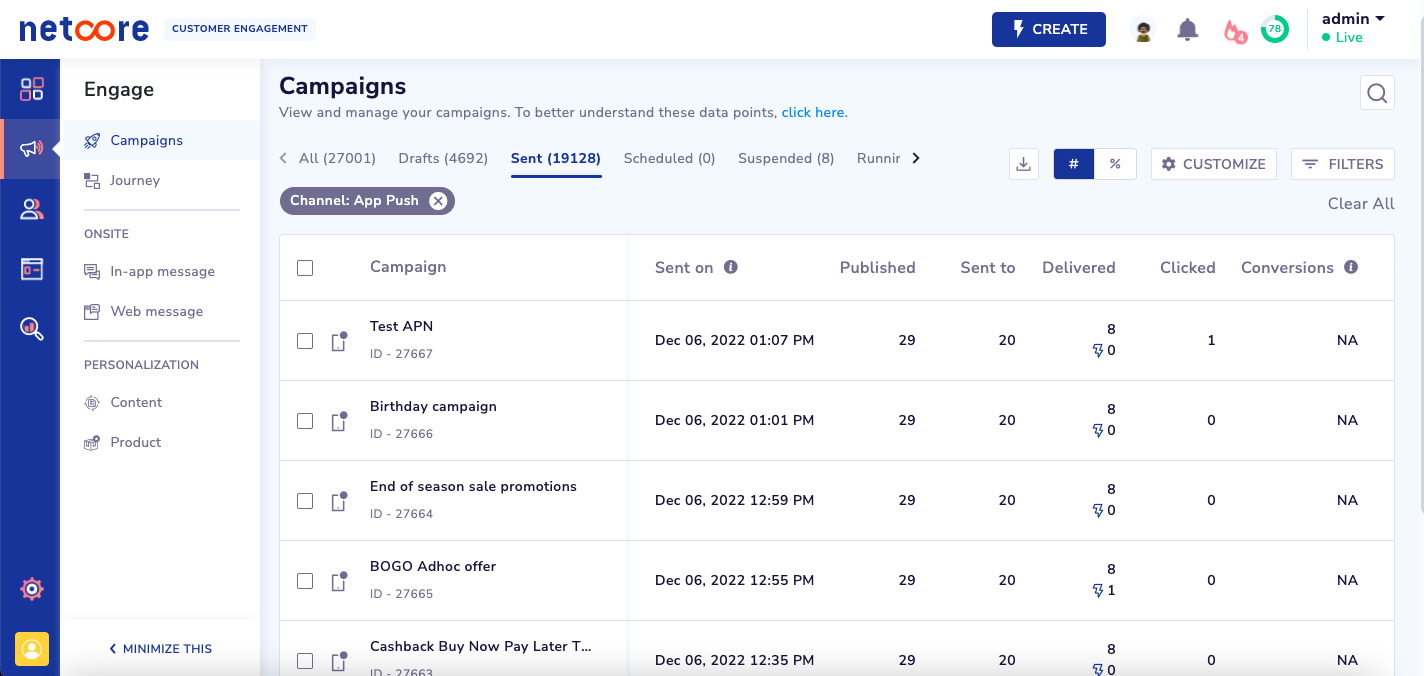
Here, you can preview the campaign, clone the same or download user-level reports by clicking on the ellipsis (3 dots) against each campaign. You can also use search, sort, filter options to find relevant campaigns in the listing page.
Below the campaign performance metrics shown for app push notifications on the listing page:
- Published - This is the total count of push tokens targeted in the given campaign. We send notifications to up to 5 recent tokens of the user's device by default.
- Sent - This is the unique count of users to whom a push notification has been sent.
- Delivered - This is the unique count of users receiving notifications on their devices which includes both base FCM/APNS as well as push amplification deliveries.
- Push amplification contribution - This data point represents the total number of notifications delivered via Netcore's push amplification feature.
- Clicked - This is the unique count of users who've clicked on your notification.
- Conversions - This is the unique count of conversion events done by your app users attributed to this particular campaign. Conversion tracking for app push notifications works on the "in-session and last-click" attribution model.
- Revenue - This data point represents the attributed revenue for the given app push campaigns based on the conversion activity set.
Download Reports
This feature allows you to download campaign summary reports as well as user-level detailed reports of all or selected campaigns.
For any queries, please contact [email protected]
Updated 2 months ago
