
AMP in Emails
Amplify your Email Campaigns ⚡
What is AMP Email all about?
AMP for Email lets email senders use interactive AMP elements in their email messages to support a whole host of new features. Emails written with AMP can contain interactive elements, like image carousels or accordions, content stays up-to-date in the message, and the ability for recipients to take action like responding to a form all without leaving their inbox. AMP allows email senders to make API calls from within the mail and hence increase the possible use cases possible within the email.
Some Examples(For illustration purpose)


Why AMP Email?
- Increase in Conversions
- Reduce in Drop off rate
- Widens the opportunities for email usage
- Revitalizes email technology
- Offers a new level of personalisation
- Low competition
Support across following Email Clients
- Gmail
- Yahoo
- Mail.ru
Sample AMP Email Html
<!doctype html>
<html ⚡4email data-css-strict>
<head>
  <meta charset="utf-8">
  <script async src="https://cdn.ampproject.org/v0.js"></script>
  <style amp4email-boilerplate>body{visibility:hidden}</style>
</head>
<body>
  Hello, AMP4EMAIL world.
</body>
</html>
Steps involved to get started with using AMP Email
- Think of a use case where interactivity can increase the Conversion metric.
- Prepare the AMP HTML and validate the same. Fallback (static) HTML also needs to be created for customers who will not be able to see AMP mail.
- Use the Production ready AMP and corresponding Fallback content to get a verified. the AMP sender id. It is a one time process for each sender id. Once a sender id is verified, we can use it for other use cases as well.
- Get started with sending the AMP emails across and track performance.
Use CEE's Email Broadcast to send AMP Emails
- Head over to Create -> Engage with Users -> Email -> AMP.
- Setup and Audience pages remain the same.
- Select an AMP whitelisted sender id from the dropdown. If you are doing it for the first time, click on the tool tip next to Sender id to add a new AMP sender id. (Email sender had to ensure that the added AMO sender id is a whitelisted one as Netcore Cloud has no way to verify the same)
- Under Content - either create a new AMP template or use an already existing AMP template.
- If there is no existing AMP template, one can click on "Create new or select from system gallery" option and create a new template in the following ways -
- Create a template from scratch using the Drag and Drop AMP Editor.
- Create a template from scratch by pasting the AMP and Fallback code in the Code Editor option.
- Create a template by editing our ready-made templates and customising them to our needs.
- Preview the AMP and Fallback creatives and send it out.
New Additions
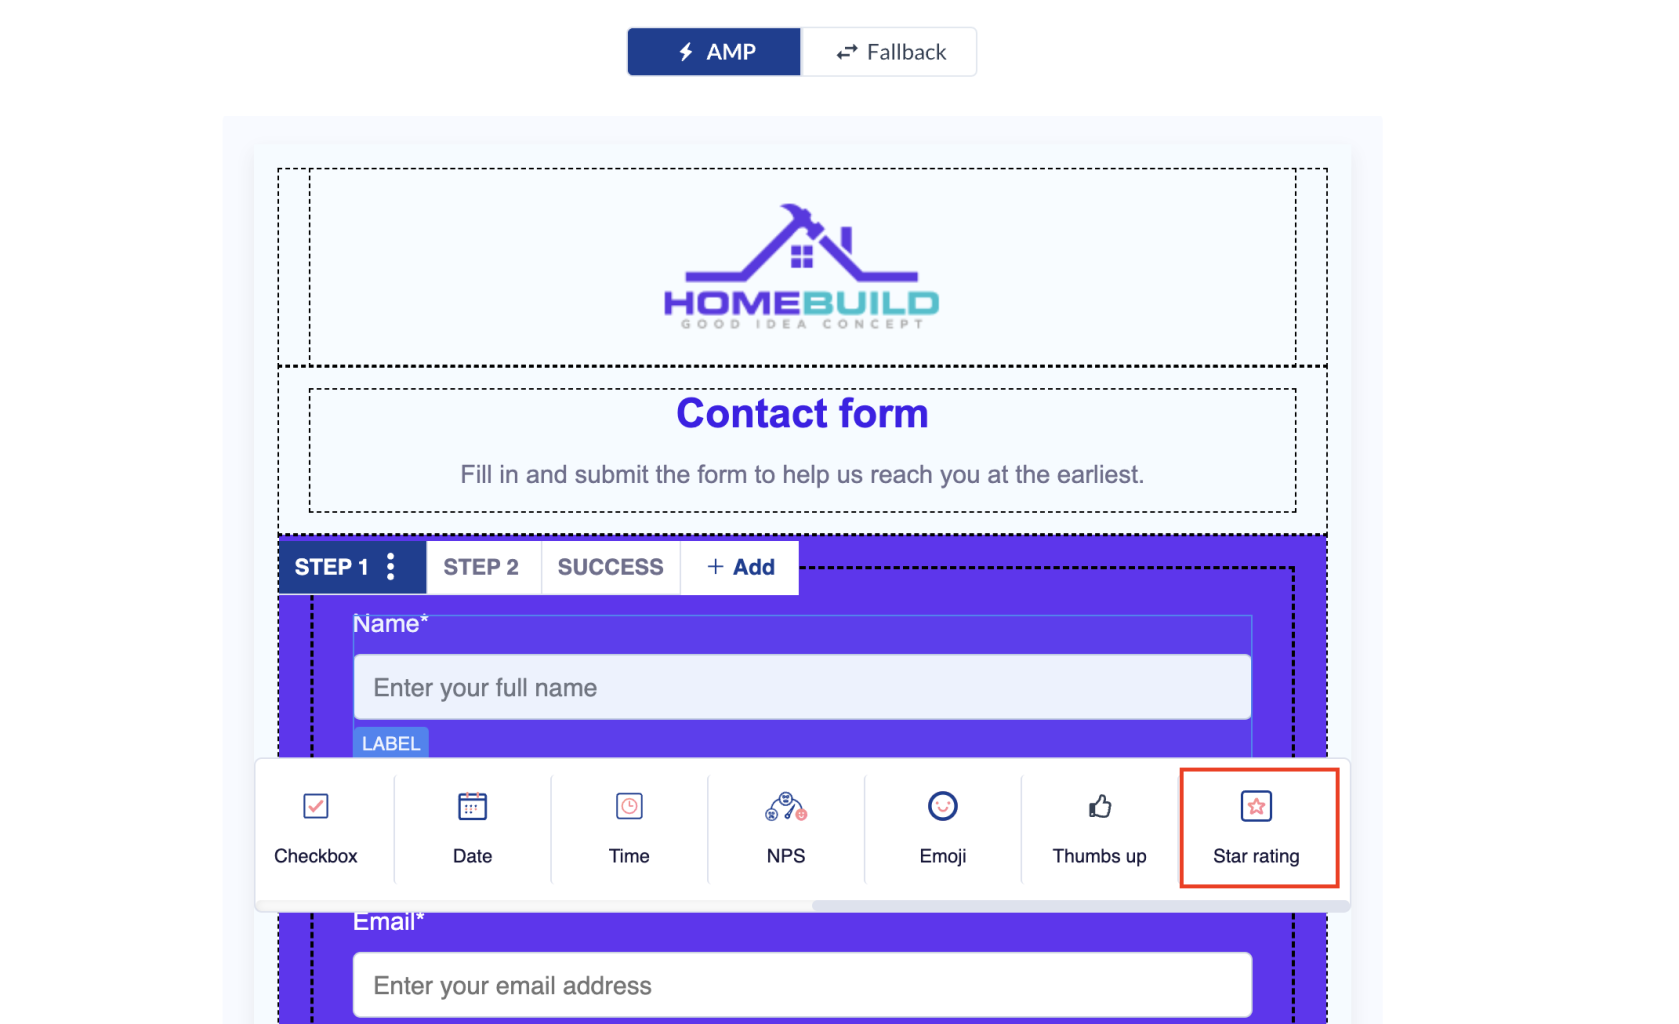
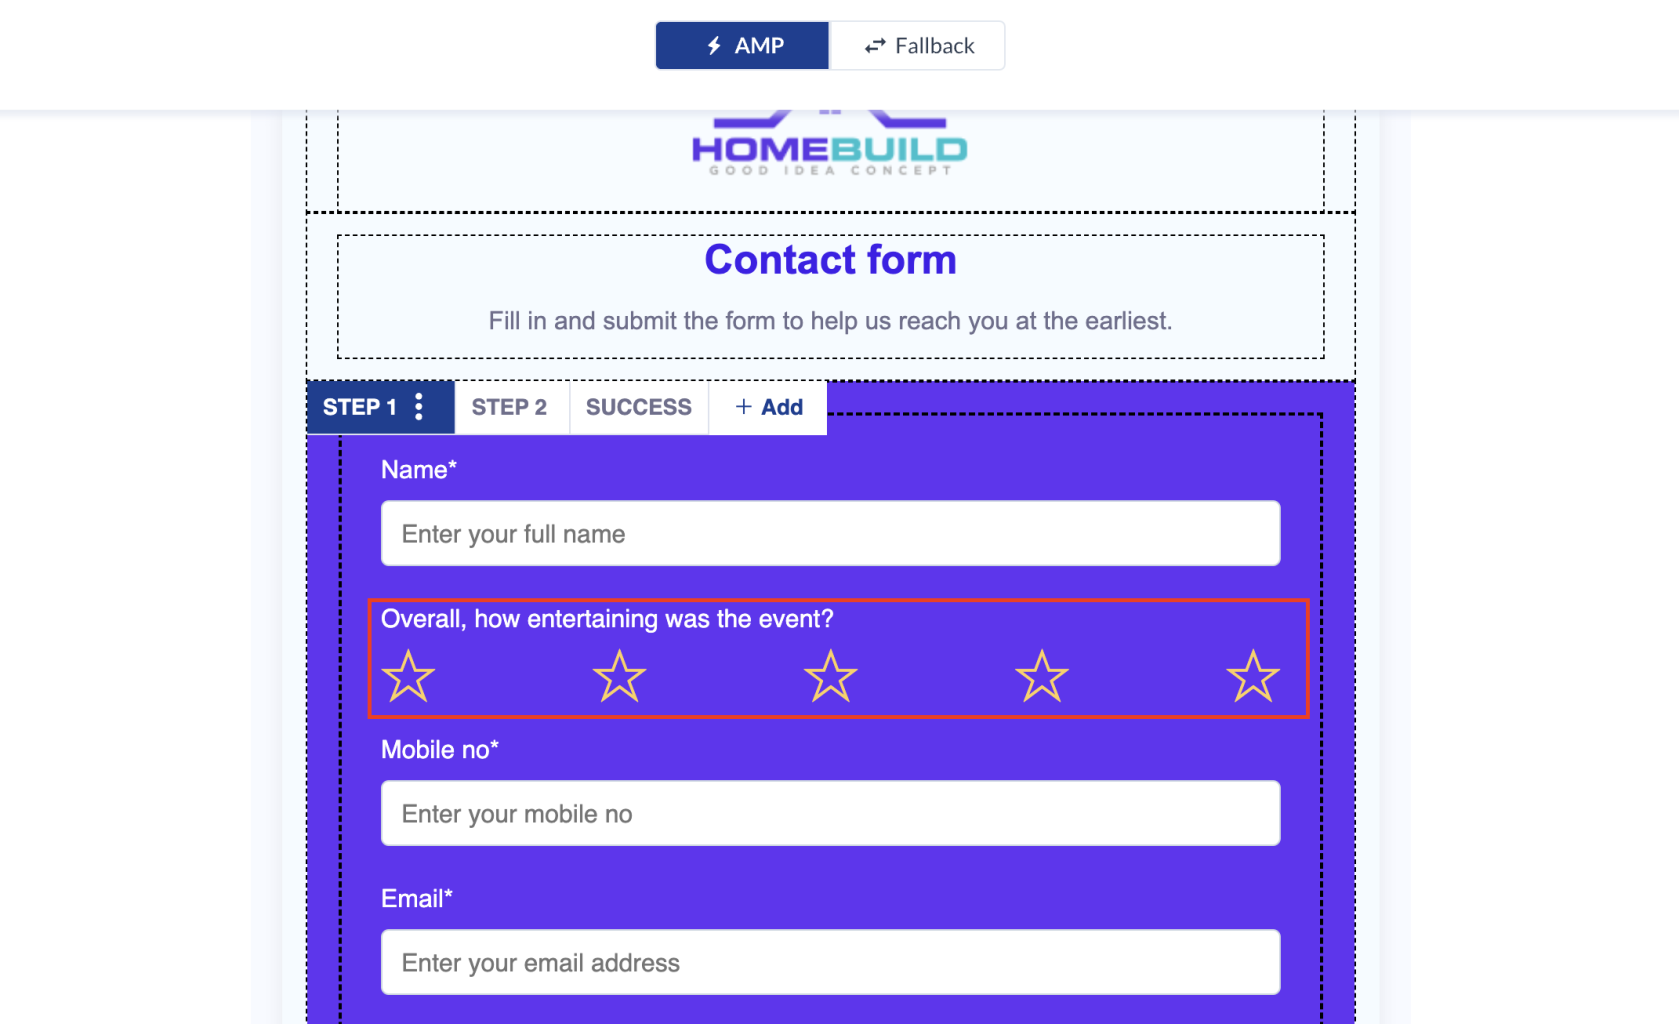
Users can add a star rating question to their forms, customize the number of stars, and even choose the color of the stars to match their branding!
The Star Rating question is perfect for product review-related use cases, as it allows customers to easily rate and provide feedback on products. However, it can also be used in other scenarios, such as event feedback, restaurant reviews, and more.
To add a Star Rating question to your form, simply add Star Rating as the question type onto your form, and then customize the number of stars and colors as desired. The Star Rating question is fully customizable, so you can make it look and function exactly how you want it to.


Important notes
- Steps mentioned above are specific to AMP. Rest of the steps to be followed are similar to standard email broadcast.
- Verification of AMP sender domain takes 1-2 weeks of time depending on the use case.
- Headers and footers will not work with the AMP email except the by default unsubscribe option.
- AMP Email's SPAM score doesn't get calculated.
- GA tracking, Conversion tracking & attachments work with AMP HTML.
- Follow the doc for detailed understanding about AMP email.
Ready to use templates in AMP
To help you better, we have added 10 ready-to-use templates to our AMP editor that you can access through: Content > AMP Templates > Create a new AMP template OR Select from Gallery
You can customize these templates by clicking Edit while hovering over any ready-to-use template.
Ready-to-use template types:
- Enquiry form: Use this template to fetch a range of information in no time.
- Referral form: Nudge your customers to send referral invites for your product and earn rewards
- Feedback form: Let your customers share their feedback and evaluate your business strategies.
- Lead generation: Fuel your prospect and generate higher converting leads for your business using this template.
- NPS survey: There is always an area of opportunity. Know your business ratings through NPS surveys to improve or maintain your influence.
- Customer Registration Form: Use this template to skyrocket customer registrations.
- Call Back Form: Nudge your customers to register for a follow-up meeting
- Investment Form: Let your customers know about the popular investment choices you offer. Generate leads by collecting customer information.
- Demo Registration: Generate highly converting leads for your business demos using this template.
- Webinar Registration: Multiply registrations on your webinars using this template

AMP editor customizations
In addition to the existing block-level customizations (bold, italic, underline, alignments, strikethrough, etc.), users can now apply character/word-level customizations as well. The 8 new customizations allow users to:
- Select line height for paragraph
- Apply link/unlink
- Undo/Redo customizations
- Add subscript characters
- Add superscript characters
- Remove applied format
- Add bullets
- Add numbers
Note:
- Customizations done under Styles>Typography section (right panel) apply to entire block
- Customizations done from the Line editor apply to the selected character/word
Important note for Form setup
- Once authenticated with a google account, and then setting up a form from template with a google sheet from the account, template will send responses only as long as the account is linked on CE panel
- Once google account is changed, template will not direct responses to the new account. i.e. template will not be of use. We recommend users to avoid switching of google accounts in AMP editor.
Updating user profile in CE
You can now directly update user attributes in Customer Engagement (CE) platform based on responses received from your sent AMP emails. The key enhancements include:
- Sync form submissions to Netcore and one additional destination (Google Sheets, Zapier, or Webhooks).
- Added support for form setup in AMP code editor.
To setup Netcore as a destination
- Open AMP DIY drag and drop editor.
- Create Form-Based AMP Template
- Click Form Setup and navigate to SETUP in the Form Setup section.
- Configure profile updates by mapping form questions to CE attributes in Netcore - update user profile card.
Setup Netcore as your destination
Notes
- Form responses directly update user attributes. We suggest to review Campaigns, Journeys, or Segments where the attributes are used.
- Email and Primary Key attributes cannot be mapped/edited through AMP responses.
Form configuration in AMP editor
Multi-step form in the DIY AMP editor allows users to create an App-like pagination experience in emails.
Form configuration is a powerful feature that allows users to add conditions to decide the flow of the Multi-step form.
e.g. Brand has sent an NPS Survey AMP email. Now if the end-user picks 5 or less on the NPS scale, it means that the end user is not happy with the Brand. Brands may want the next questions to be about suggesting points of improvement or about specifying what went wrong. Similarly, if a user picks 6 or above, it means that he is satisfied with the service and the brand can then ask for points which user loved about their product.
This will indeed benefit the marketeer as using this feature will cease the need to send AMP emails multiple times to get scenario-based user feedback.
Important update
We are now consolidating responses for both fallback and AMP into a single destination, the Google Sheet linked from the form setup.
Efficiency for Brands:
Eliminates the need for configuring a separate URL for the fallback HTML.
Responses to the fallback are now collated in one consolidated Google Sheet.
Saves effort and streamlines the setup process for brands.
Consistent End-User Experience:
End-users will experience AMP HTML directly in the browser, ensuring a consistent email experience.
Enhances user engagement and interaction with email content.
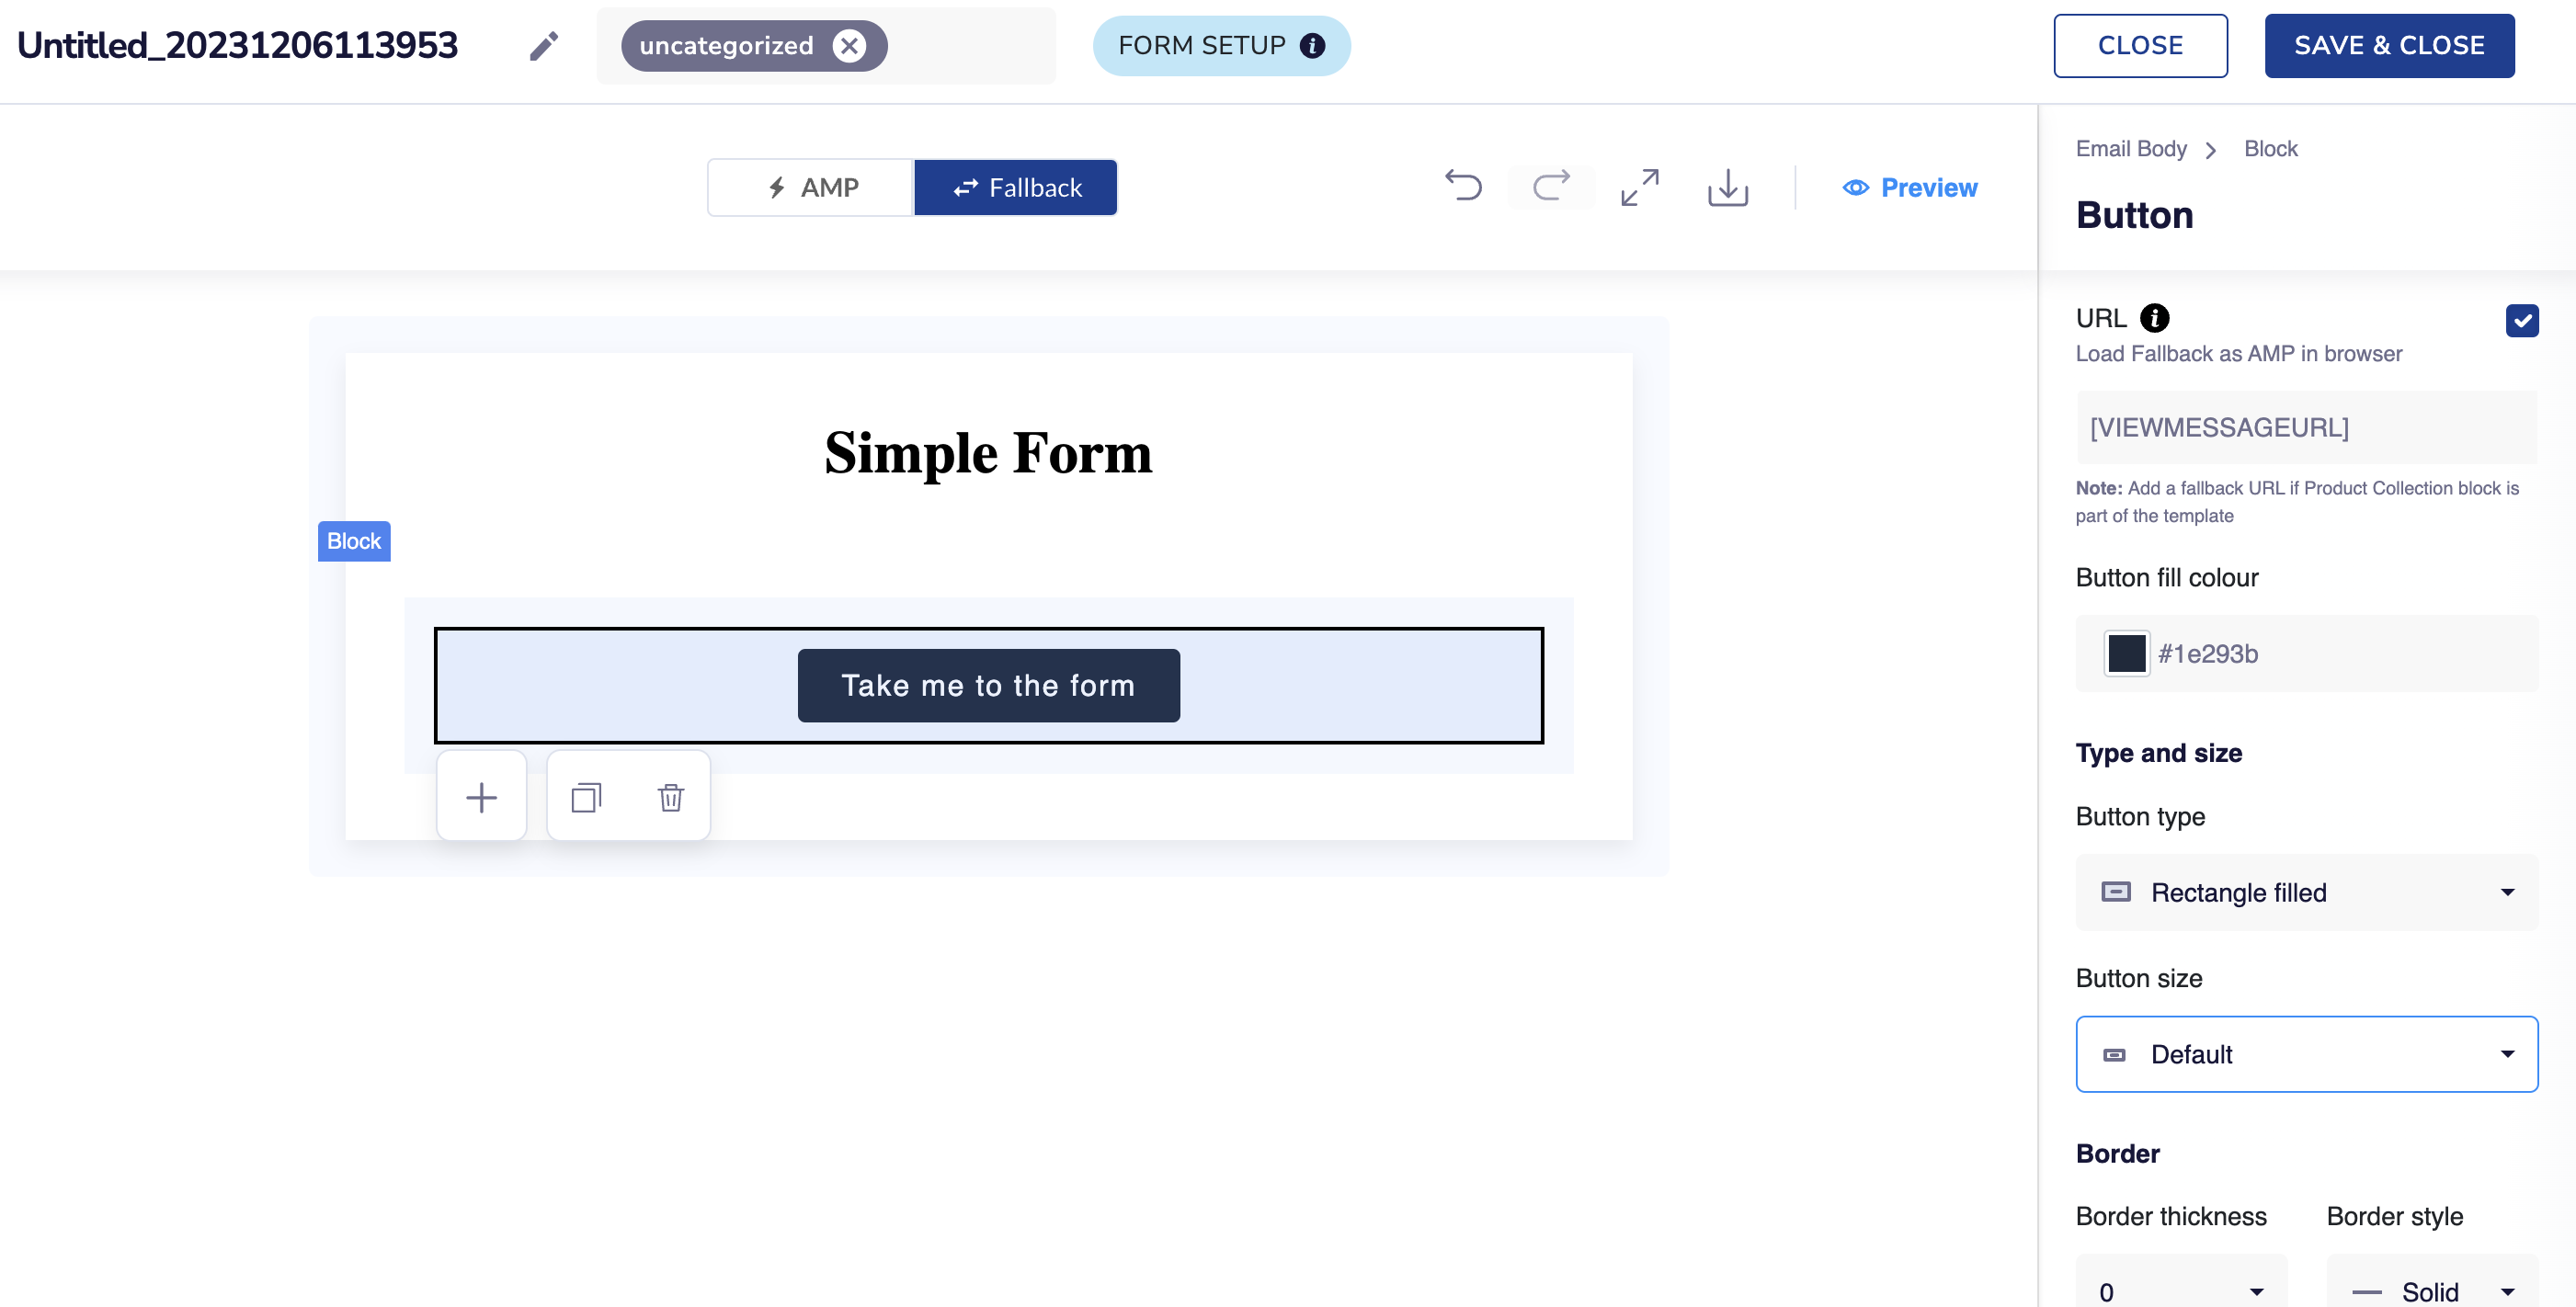
To access this feature, follow these steps in the AMP editor:
- Add a form to your AMP email.
- Under the Fallback section, check the box for "Load Fallback as AMP in browser"
If you choose not to check the box, you will need to manually add a URL for the fallback.
Important Note
- In order to access the feature, upgrade to the latest link tracking module (version V3).
- If you encounter any issues accessing the feature, please reach out to your account manager/[email protected] for assistance.
Navigation
Go to Content > AMP Templates > Create new > Form
Click on the settings option after clicking the Form block.

The format of each condition will be Question > Operator > Value - dropdowns for each will contain details based on the form's data

After adding the conditions, users can verify the changes by testing them in the AMP preview.
Note
- Conditions added for the form configuration feature are autosaved
- Conditions applicable only for options/dropdown/rating questions
- Max 5 conditions for each step
- The default flow for each step will be to the next subsequent step (e.g. Step 1> Step 2)
- The same feature can be used to send AMP emails via Journey as well
e.g. for Illustration
- If the user does not receive a question (as per the conditions added) - the answer in the response sheet will be a blank cell
- If there is a conflict in conditions for a step - the first condition will be assigned priority
Accordions in AMP editor
Accordions & Carousels are among the most used components in AMP.
Accordions are used for displaying/collapsing content within a topic. e.g. FAQs in email, Multiple features/products with their descriptions, etc. Usually for feature adoption, hiding/displaying detailed product descriptions.
Navigation
Go to Content > AMP Templates > Create new > Basic elements > Accordion Block

Each Accordion block can have a set of max 8 accordions.
You can add details/customize font, and color & have character-level customizations using the AMP editor
Maximum 5 accordion blocks can be added in 1 template.


Carousels in AMP editor
Accordions & Carousels are among the most used components in AMP.
Carousels are used to showcase a gallery of images/gifs in a template
e.g.
- Displaying top-seller apparel in a carousel in a welcome email
- Displaying services offered by a bank in the email (feature adoption)
Navigation
Go to Content > AMP Templates > Create new > Basic elements > Image Carousel

A customer can add a minimum of 2 and a maximum of 10 images to one carousel.
Max 5 carousels can be used within the same creative.

Resizing your carousel size
- You can now resize both portrait and landscape carousels to match your desired dimensions.
- Additionally, the editor will provide recommended height or width for a perfect fit
- Display a carousel thumbnail below each carousel for a better user experience.

Important note for Accordion & Carousel
- The first time you add AMP (accordion/carousel) elements to the template, the corresponding Fallback will be rendered. Once you make changes in fallback, AMP & fallback will be independent of each other. e.g. You add a carousel of 3 images in AMP. If you want to add a .gif of 3 images in the fallback instead, you will be able to do so.
- If all the elements from carousels/accordions in fallback are blank, preview and the HTML mail will not consider the empty spaces.
- Recommended aspect ratio for carousel images is 2:1
AMP Quiz
Introduction:
The AMP Quiz feature in the AMP DIY Editor enables users to create interactive quizzes within emails, providing recipients with an app-like experience. With this feature, users can easily add questions, customize layouts, define response texts for correct and wrong answers, include a results page, and display the correct, skipped, and wrong answers to enhance engagement and gamify the quiz experience for their users. Additionally, the collected quiz data can be conveniently stored in Google Sheets, integrated with Zapier, or retrieved through Webhooks for further analysis and automation.
Key Features:
- Question Creation: Users can create engaging quiz questions directly within the AMP DIY Editor. They can add multiple-choice questions to tailor the quiz content according to their specific requirements.
- Customized Layouts: The AMP Quiz feature offers customizable layouts, allowing users to design visually appealing and brand-consistent quiz experiences. Users can modify the fonts, colors, backgrounds, and other visual elements to create a unique quiz appearance.
- Response Texts for Right/Wrong Answers: To provide instant feedback to participants, users can define custom response texts for correct and wrong answers. This enables a personalized experience and encourages participants to continue engaging with the quiz.
- Results Page: Upon completion of the quiz, participants will be directed to a results page. This page can display their score, provide personalized messages based on their performance, and include calls-to-action for further engagement.
- Display of Correct, Skipped, and Wrong Answers: The AMP Quiz feature allows users to choose whether to display the correct, skipped, and wrong answers to participants. This feature enhances transparency and provides an opportunity for participants to learn from their mistakes or missed questions.
- Gamification: By leveraging the interactive nature of the AMP Quiz feature, users can gamify the quiz experience for their participants.
- Quiz Data Collection and Integration: The quiz data collected from participants can be seamlessly integrated with various platforms. Users can choose to store the data in Google Sheets for easy access and analysis, integrate with Zapier to trigger automated actions based on quiz results or retrieve the data through Webhooks for further customization and integration.
How to Create an AMP Quiz:
To create an AMP Quiz using the AMP DIY Editor, follow these steps:
- Access the AMP DIY Editor creation page.
- Select Widgets > AMP Quiz
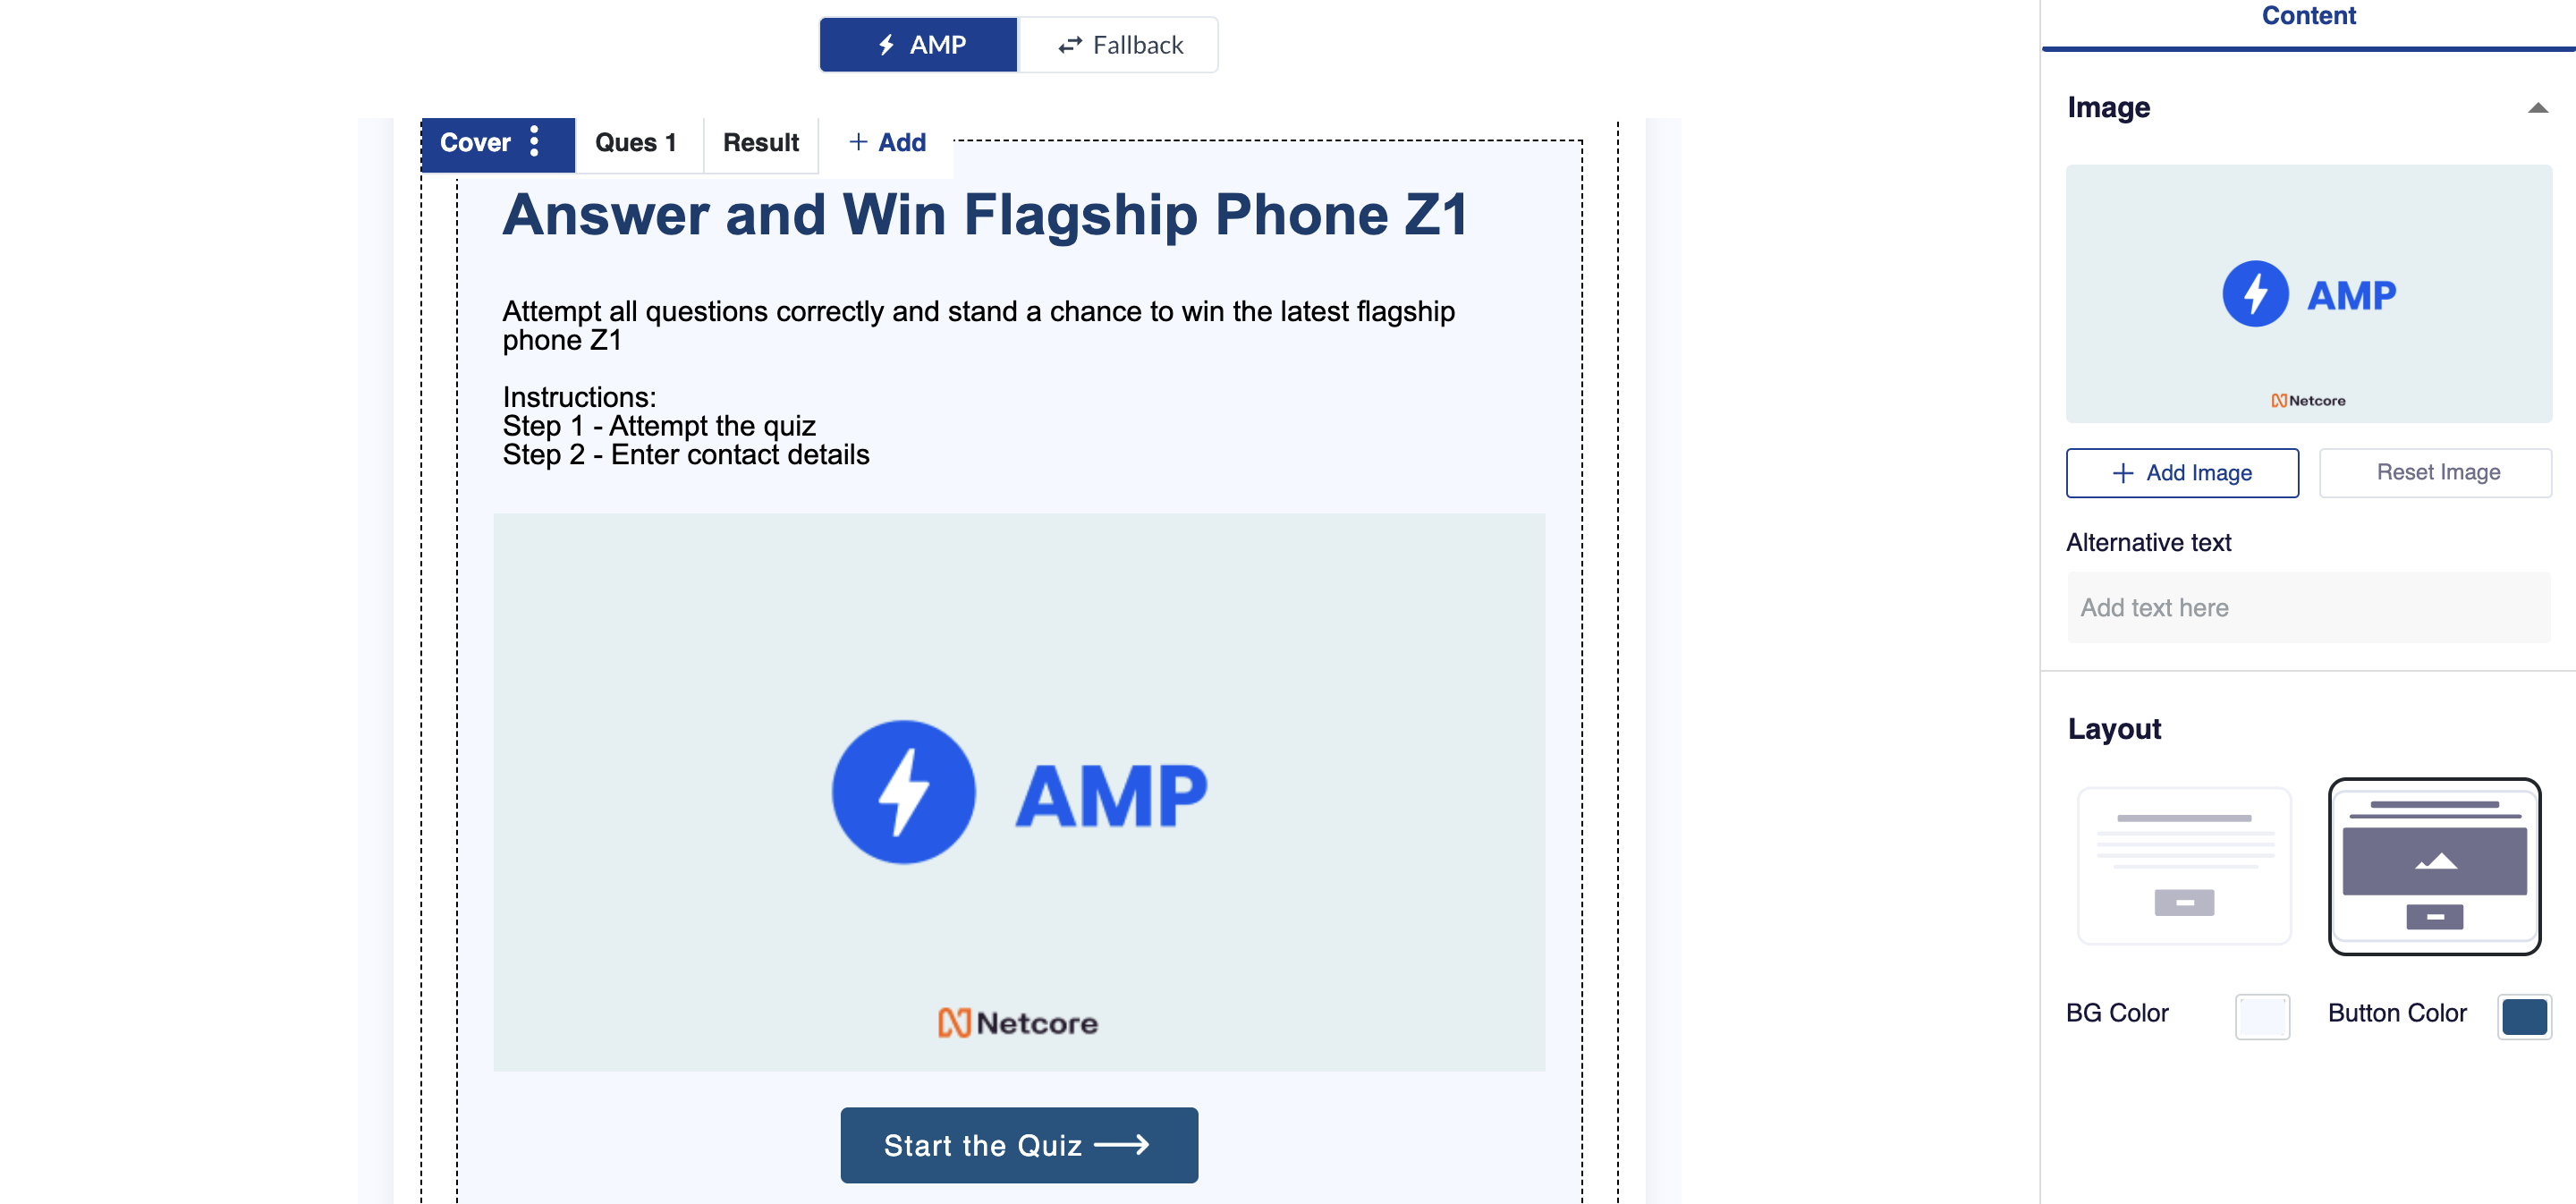
- Customize the layout, including fonts, colors, backgrounds, and other visual elements.
- Add questions to the quiz and its answer
- Optionally, Define the response texts for correct and wrong answers to provide immediate feedback to participants.
- Configure the results page, including score display, personalized messages, and calls to action.
- Save the template
- Publish your AMP campaign.
Users can collect and integrate the quiz data through the following options:
Google Sheets: The collected quiz data can be automatically stored in Google Sheets, allowing for easy access, analysis, and collaboration with other team members.
Zapier Integration: By integrating with Zapier, users can leverage the quiz results to trigger automated actions
Updated 8 days ago